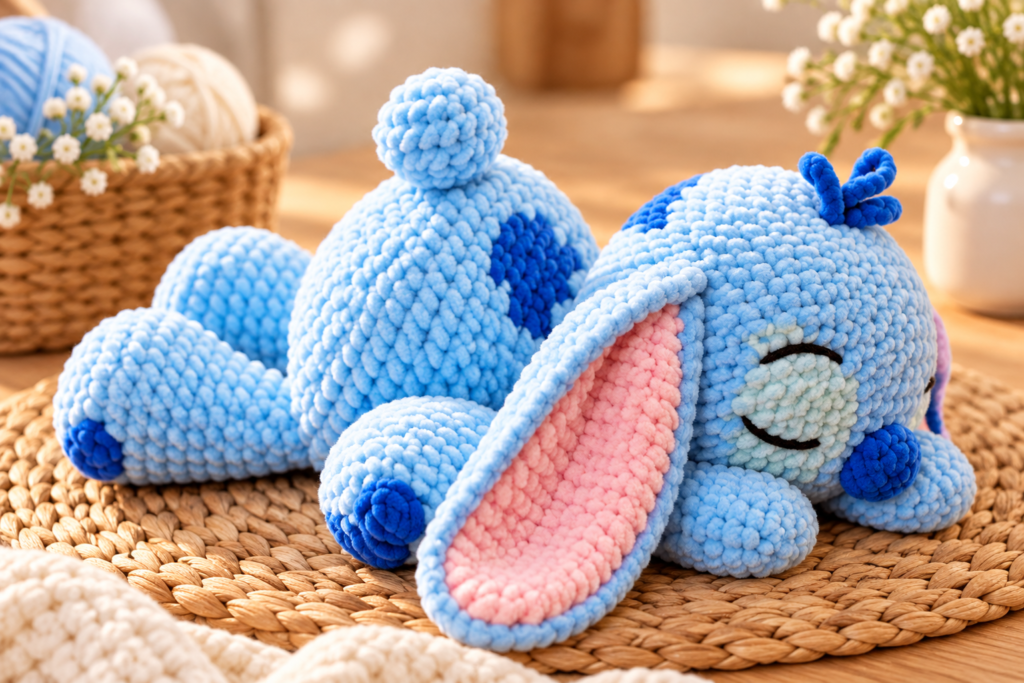
There’s something extra adorable about a tiny crochet bunny curled up for a nap. With floppy ears, soft yarn, tiny paws, and a peaceful sleeping pose, a crochet sleeping bunny is the kind of amigurumi project that instantly adds charm to any handmade collection.
The best part is that sleeping bunny designs don’t need to be complicated. Beginners can create beautiful bunnies using basic amigurumi shapes and simple crochet stitches.
Whether you want to make a cute handmade gift, a nursery decoration, an Easter project, or simply practice your crochet skills, these easy crochet sleeping bunny pattern ideas for beginners are a great place to start.
Why Crochet a Sleeping Bunny?
Sleeping bunny amigurumi is especially cute because the relaxed pose gives the finished project a soft and cozy appearance.
Unlike some standing amigurumi animals, sleeping bunnies can also be easier to assemble because the body, legs, and head don’t need to support the toy in an upright position.
You can customize your bunny with different yarn colors, ear styles, facial details, tiny accessories, and sleeping positions.
Pastel shades such as baby blue, blush pink, cream, lavender, and mint green work beautifully, but neutral shades like beige, white, and soft brown can create an equally adorable result.
Here are seven ideas to inspire your next project.
1. Classic Floppy-Ear Sleeping Bunny
The classic sleeping bunny is one of the easiest designs to try.
Create a rounded head and a soft oval body, then add two long floppy ears. Position the bunny on its belly with its front paws resting near the face.
Instead of using open eyes, embroider two small curved lines to create a peaceful sleeping expression.
You can also add a tiny embroidered nose and a small pom-pom-style crochet tail.
This simple design is perfect for beginners because most pieces can be made using basic amigurumi techniques.
2. Blue Sleeping Bunny With Extra-Long Ears
A pastel blue bunny is an adorable choice for a soft and dreamy crochet project.
Make the head and body using light blue yarn, then use a slightly darker shade of blue for the paws, tail, or other small details.
The ears can become the main feature of this design. Crochet them slightly longer than usual and add a contrasting inner ear using pink, cream, or another pastel shade.
Arrange one ear beside the bunny’s face while allowing the second ear to rest naturally along the body.
The oversized ears give even a very simple bunny plenty of personality.
3. Curled-Up Sleeping Bunny
Instead of making a bunny stretched out on its belly, create one that looks curled up for a cozy nap.
Make a rounded body and position the head slightly toward one side. Attach the legs close to the body so the finished bunny has a compact shape.
Place the ears gently along the side of the head.
A small fluffy tail at the back completes the curled-up appearance.
This design looks especially cute when displayed in a small crochet basket or on a handmade blanket.
4. Sleeping Bunny With a Tiny Blanket
Give your sleeping bunny its own miniature crochet blanket.
First, create a simple sleeping bunny using your favorite colors. Then crochet a small rectangular blanket using basic rows of single crochet, half-double crochet, or another beginner-friendly stitch.
Place the blanket partially over the bunny’s body so it looks like the bunny has fallen asleep underneath it.
You could make the blanket in a contrasting color or use several pastel shades for a striped design.
This little detail can turn a basic amigurumi bunny into a charming display piece.
5. Sleeping Bunny With a Flower Crown
Flowers can give a simple crochet bunny a beautiful spring-inspired look.
Create several miniature crochet flowers and attach them between or beside the bunny’s ears.
You can use tiny daisies, roses, or simple five-petal flowers.
Soft pink, yellow, lavender, and white work particularly well with cream or beige bunny yarn.
Add one or two small green crochet leaves between the flowers to complete the crown.
This idea is lovely for spring and Easter-inspired crochet projects.
6. Mini Sleeping Bunny
If you enjoy quick crochet projects, try creating a miniature version.
Use thinner yarn and a smaller crochet hook to make a tiny bunny that fits comfortably in your hand.
Keep the design simple with a rounded body, small head, two floppy ears, four tiny paws, and an embroidered sleeping face.
Because mini amigurumi uses less yarn, this is also a great project for leftover yarn from previous crochet creations.
Make several mini sleeping bunnies in different colors to create an adorable little collection.
7. Chunky Plush Sleeping Bunny
For an extra soft and cuddly appearance, make your sleeping bunny with chunky or chenille-style yarn.
The thicker yarn creates a plush texture and makes the bunny look wonderfully cozy.
Choose soft colors such as baby blue, cream, pale pink, lavender, or light brown.
Keep the body shapes relatively simple because the fluffy yarn already adds plenty of texture.
A chunky sleeping bunny can also work up faster than a small amigurumi project because the larger stitches help the project grow quickly.
How to Crochet a Simple Sleeping Bunny
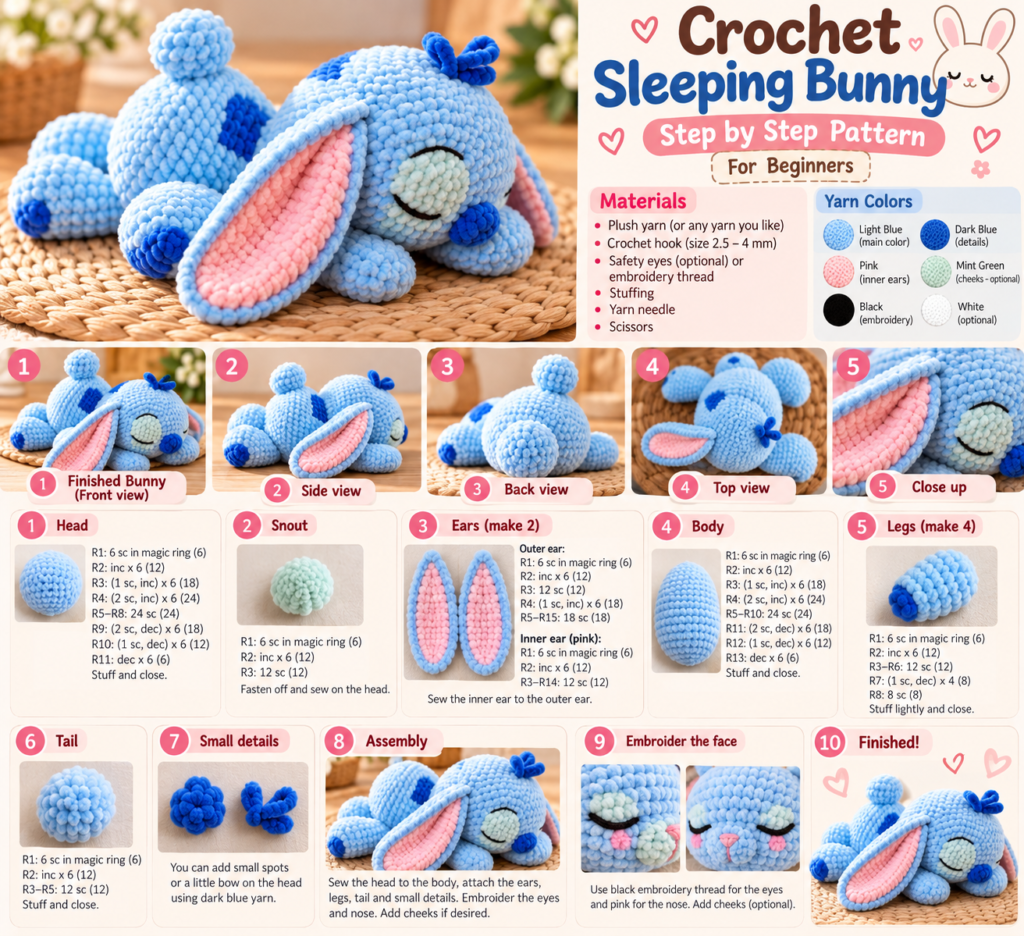
A beginner-friendly sleeping bunny can be constructed from several basic shapes.
Start with the head by crocheting a sphere using continuous rounds. Begin with a magic ring, gradually increase until the head reaches the desired width, work several even rounds, and then begin decreasing.
Before closing the head completely, add stuffing gradually to maintain a smooth shape.
For the body, create a slightly longer oval shape. A sleeping bunny usually looks especially cute when the body is wider in the middle and slightly narrower toward the ends.
Next, crochet four small paws. They can be simple oval or cylindrical shapes.
Create two long ears separately. If you want contrasting inner ears, crochet smaller ear-shaped pieces in another color and sew them onto the larger ears.
Once all the pieces are finished, arrange them before sewing. Position the head slightly lower or sideways to create the relaxed sleeping pose.
Attach the ears so they naturally fall beside the bunny’s face or body.
Finally, embroider the closed eyes, nose, and any other facial details.
Easy Sleeping Bunny Assembly Order
When assembling your bunny, working in a consistent order can make the process easier.
Start by stuffing and closing the head and body. Next, attach the head to the body and check that the sleeping position looks natural.
Sew the front and back paws into place before attaching the ears. This makes it easier to adjust the bunny’s overall pose.
Attach the long floppy ears around the sides or top of the head.
Finish with the tail and embroidered facial details.
Before permanently sewing each piece, use pins or stitch markers to test its position. Small changes in the ears or paws can completely change the bunny’s expression and pose.
Best Yarn for Crochet Sleeping Bunnies
Several types of yarn can work well for sleeping bunny amigurumi.
Cotton yarn provides excellent stitch definition and makes it easy to see your stitches while crocheting.
Acrylic yarn is another beginner-friendly choice because it is widely available in many colors.
Chenille or plush yarn creates the soft, fluffy appearance often seen in larger crochet animals.
If you’re a complete beginner, regular cotton or acrylic yarn may be easier to work with before moving on to very fluffy yarn.
Cute Color Combinations to Try
You can completely change the appearance of your sleeping bunny simply by changing the colors.
Try baby blue with pink inner ears for a dreamy pastel bunny. Cream with dusty pink creates a softer neutral style, while beige with white works beautifully for farmhouse-inspired crochet decor.
Lavender and cream are another lovely combination, especially for spring projects.
You could even make several sleeping bunnies using different pastel shades and display them together.
Beginner Tips for a Cuter Sleeping Bunny
Try to keep your crochet tension consistent throughout the project. Amigurumi usually looks best when the stitches are tight enough that the stuffing cannot easily be seen.
Add stuffing little by little instead of filling the entire piece at once. This gives you more control over the final shape.
Pay special attention to the placement of the ears. Long floppy ears positioned beside the face can make the bunny look much more relaxed.
The sleeping expression is also important. Two simple curved embroidered eyes can create a sweet face without requiring complicated details.
If the bunny is intended for a baby or young child, embroidered facial features are generally preferable to detachable plastic pieces.
Frequently Asked Questions
Is a crochet sleeping bunny suitable for beginners?
Yes. Many sleeping bunny designs use basic amigurumi techniques such as single crochet, increases, decreases, and working in continuous rounds.
What crochet hook should I use?
The best hook size depends on your yarn. For amigurumi, crocheters often use a hook slightly smaller than the yarn label’s general recommendation to help create a firm fabric.
How do I make the bunny look like it is sleeping?
The pose makes a big difference. Position the head slightly sideways or downward, place the paws close to the face, and add embroidered closed eyes.
Can I make the bunny with plush yarn?
Yes. Plush or chenille yarn can create an especially soft sleeping bunny. Keep in mind that fluffy yarn can make individual stitches more difficult to see, so beginners may find regular yarn easier at first.
Can I change the bunny colors?
Absolutely. Pastel colors, neutrals, and natural bunny shades can all work beautifully. You can also use contrasting colors for the inner ears, paws, and tail.
Final Thoughts
These easy crochet sleeping bunny pattern ideas for beginners are a lovely way to practice amigurumi while creating something incredibly cute.
Start with a classic floppy-ear bunny, experiment with an adorable curled-up pose, add a miniature blanket or flower crown, or create a chunky plush version using soft yarn.
Once you understand the basic head, body, paws, and ears, you can mix different colors and accessories to create your own unique sleeping bunny.