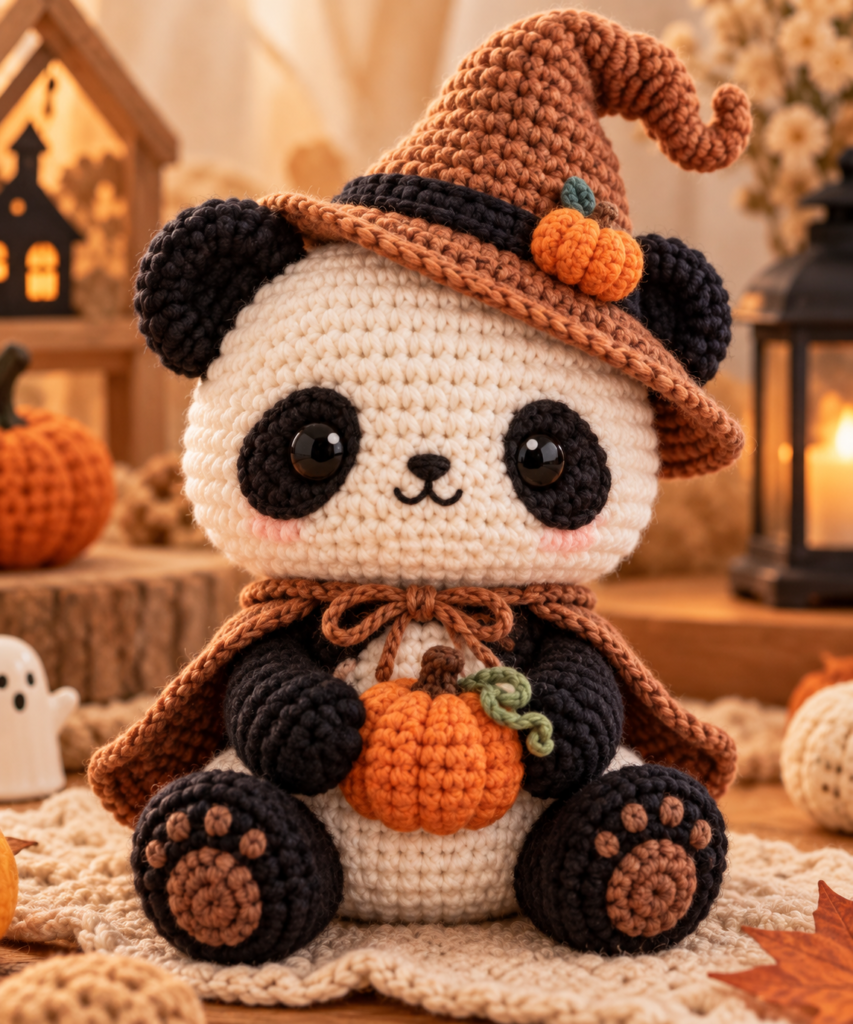
If you love cute amigurumi with a spooky seasonal twist, these Easy Crochet Halloween Panda Pattern Ideas for Beginners are a fun project to try. A classic black-and-white panda becomes especially adorable for Halloween when you add a witch hat, pumpkin, cape, candy bucket, or other autumn accessories.
The best part is that you can build most of these Halloween panda amigurumi designs from beginner-friendly shapes. You will mainly use single crochet, increases, decreases, magic rings, and simple sewing.
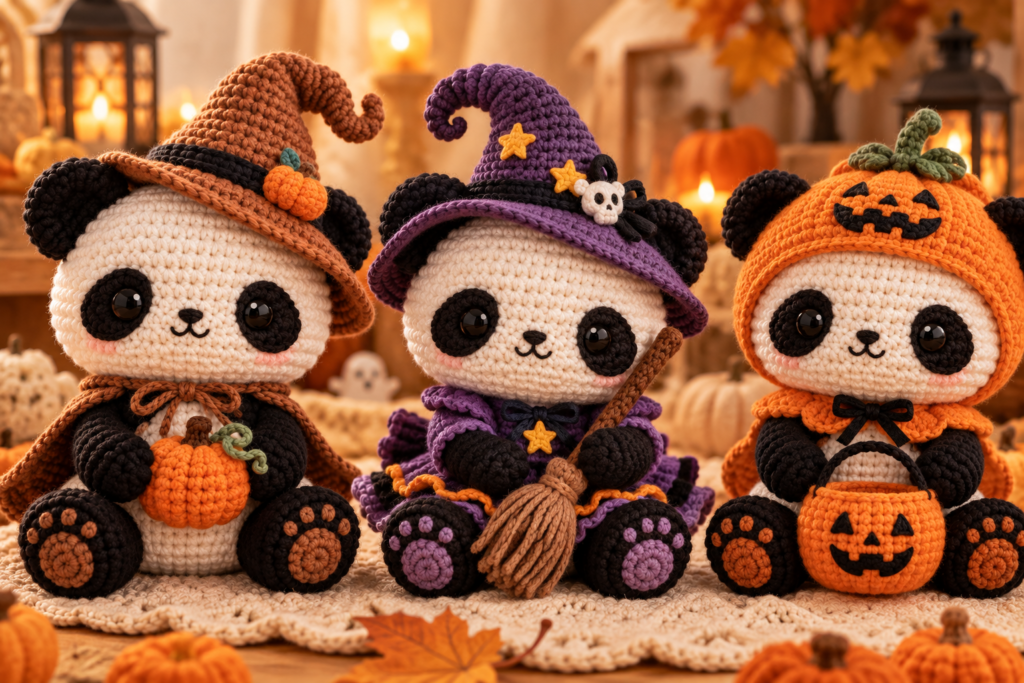
Below you’ll find 7 Halloween panda ideas, and each idea includes its own crochet instructions so you can recreate the look while changing colors and details to make the finished panda your own.
Crochet Abbreviations Used
MR = Magic Ring
ch = Chain
sc = Single Crochet
inc = Increase — 2 sc in one stitch
dec = Invisible decrease
sl st = Slip stitch
BLO = Back loop only
FO = Fasten off
The number in parentheses at the end of a round shows how many stitches you should have when that round is complete.
1. Witch Hat Halloween Panda With Pumpkin
This first Halloween panda is inspired by the cozy look in the reference image. It has a round cream-and-black panda body, oversized paws, a warm brown witch hat, a matching cape, and a small orange pumpkin held between its arms.
Materials
Use cream or off-white yarn for the head and belly, black yarn for the ears, eye patches, arms, and legs, pumpkin orange for the pumpkin, and warm brown for the hat and cape.
You will also need a crochet hook suitable for your yarn, fiberfill, yarn needle, stitch markers, scissors, black embroidery thread, and optional safety eyes.
Head
Using cream yarn:
R1: 6 sc in MR (6)
R2: inc × 6 (12)
R3: (1 sc, inc) × 6 (18)
R4: (2 sc, inc) × 6 (24)
R5: (3 sc, inc) × 6 (30)
R6: (4 sc, inc) × 6 (36)
R7: (5 sc, inc) × 6 (42)
R8: (6 sc, inc) × 6 (48)
R9–R16: sc around (48)
R17: (6 sc, dec) × 6 (42)
R18: (5 sc, dec) × 6 (36)
R19: (4 sc, dec) × 6 (30)
R20: (3 sc, dec) × 6 (24)
Begin stuffing firmly while keeping the head rounded.
R21: (2 sc, dec) × 6 (18)
R22: (1 sc, dec) × 6 (12)
R23: dec × 6 (6)
FO and close the opening.
Black Eye Patches
Make 2 with black yarn.
R1: 6 sc in MR (6)
R2: inc × 6 (12)
R3: (1 sc, inc) × 6 (18)
FO, leaving a long tail for sewing.
Gently shape each circle into a slight oval while sewing it onto the face.
Position the eyes in the center of the patches. Embroider a small black nose and curved mouth beneath them.
Panda Ears
Make 2 in black.
R1: 6 sc in MR (6)
R2: inc × 6 (12)
R3: (1 sc, inc) × 6 (18)
R4: sc around (18)
FO and leave a long sewing tail.
Flatten each ear slightly and sew one to either side of the head.
Body
Start with cream yarn.
R1: 6 sc in MR (6)
R2: inc × 6 (12)
R3: (1 sc, inc) × 6 (18)
R4: (2 sc, inc) × 6 (24)
R5: (3 sc, inc) × 6 (30)
R6–R11: sc around (30)
R12: (3 sc, dec) × 6 (24)
R13–R14: sc around (24)
R15: (2 sc, dec) × 6 (18)
Stuff the body.
R16: sc around (18)
FO with a long tail and sew the body securely beneath the head.
Arms
Make 2 in black.
R1: 6 sc in MR (6)
R2: inc × 6 (12)
R3–R9: sc around (12)
R10: (2 sc, dec) × 3 (9)
Lightly stuff only the lower portion.
FO and flatten the opening.
Sew the arms along the sides of the body, angling them slightly forward so they can hold the pumpkin.
Legs
Make 2 in black.
R1: 6 sc in MR (6)
R2: inc × 6 (12)
R3: (1 sc, inc) × 6 (18)
R4–R7: sc around (18)
R8: (1 sc, dec) × 6 (12)
R9–R11: sc around (12)
Stuff firmly and FO.
Sew the legs near the lower sides of the body.
Optional Paw Pads
Using cream yarn, crochet one small circle for each foot:
R1: 6 sc in MR
R2: inc × 6 (12)
FO and sew onto the center of the black foot.
Tiny embroidered cream circles can be added above the main pad to create toe details.
Mini Pumpkin
Using orange:
R1: 6 sc in MR (6)
R2: inc × 6 (12)
R3: (1 sc, inc) × 6 (18)
R4: (2 sc, inc) × 6 (24)
R5–R8: sc around (24)
R9: (2 sc, dec) × 6 (18)
Stuff firmly.
R10: (1 sc, dec) × 6 (12)
R11: dec × 6 (6)
Close the opening.
Thread a long strand of orange yarn through the center of the pumpkin several times, wrapping it around the outside to create pumpkin sections.
For the stem, use brown yarn:
ch 4, starting in the second chain from the hook, 3 sl st.
FO and sew to the pumpkin.
Witch Hat
Using warm brown yarn:
R1: 4 sc in MR (4)
R2: sc around (4)
R3: (1 sc, inc) × 2 (6)
R4: sc around (6)
R5: (2 sc, inc) × 2 (8)
R6: (3 sc, inc) × 2 (10)
R7: (4 sc, inc) × 2 (12)
R8: (1 sc, inc) × 6 (18)
R9: (2 sc, inc) × 6 (24)
R10: (3 sc, inc) × 6 (30)
R11: (4 sc, inc) × 6 (36)
For the brim:
R12: FLO, (5 sc, inc) × 6 (42)
R13: (6 sc, inc) × 6 (48)
R14: (7 sc, inc) × 6 (54)
FO.
Add a black yarn band around the base of the hat. A tiny orange pumpkin applique can be added to one side.
Simple Halloween Cape
Using brown yarn:
ch 25
Row 1: Starting in second ch, 24 sc
Row 2: ch 1, turn, (3 sc, inc) × 6 (30)
Row 3: ch 1, turn, sc across (30)
Row 4: ch 1, turn, (4 sc, inc) × 6 (36)
Rows 5–10: ch 1, turn, sc across (36)
FO.
Add two chains or yarn ties at the upper corners so the cape can be tied loosely around the panda.
2. Pumpkin Costume Panda
For this version, make the same panda head, ears, eye patches, arms, and legs from Idea 1. The main difference is the body: it becomes a plump orange pumpkin costume.
Pumpkin Body
With orange:
R1: 6 sc in MR (6)
R2: inc × 6 (12)
R3: (1 sc, inc) × 6 (18)
R4: (2 sc, inc) × 6 (24)
R5: (3 sc, inc) × 6 (30)
R6: (4 sc, inc) × 6 (36)
R7–R12: sc around (36)
R13: (4 sc, dec) × 6 (30)
R14: (3 sc, dec) × 6 (24)
R15: (2 sc, dec) × 6 (18)
Stuff firmly.
FO and leave a long tail.
Use several long strands of orange yarn to create vertical pumpkin sections around the body.
Pumpkin Collar
With green:
R1: ch 25
R2: Starting in second ch, 24 sc
R3: sl st, sc, hdc, sc repeated across
Wrap the leafy collar around the panda’s neck and sew the ends together.
Add the panda head and black limbs.
The result is a cute panda popping out of a round pumpkin costume.
3. Purple Witch Panda
For a brighter Halloween look, make a black-and-white panda with a purple witch hat and matching cape.
Use the head, ears, eye patches, body, arms, and legs from Idea 1.
Purple Witch Hat
Use purple yarn and follow the witch-hat rounds from Idea 1.
For the band, crochet:
ch 37
Starting in second chain:
36 sc
Wrap it around the base of the hat and sew the ends together.
Add a small orange crochet buckle or pumpkin decoration.
Purple Cape
ch 25
Row 1: 24 sc
Row 2: (3 sc, inc) × 6 (30)
Row 3: sc across
Row 4: (4 sc, inc) × 6 (36)
Rows 5–9: sc across
For a slightly spooky edge on the final row:
sl st, skip 1 st, 5 dc in next st, skip 1 st, sl st
Repeat across to create a scalloped border.
Tie around the neck with black or orange yarn.
4. Halloween Candy Bucket Panda
This version gives your panda a tiny trick-or-treat accessory.
Crochet the basic panda using the instructions from Idea 1, but leave the arms slightly loose until the bucket is finished.
Orange Candy Bucket
With orange yarn:
R1: 6 sc in MR (6)
R2: inc × 6 (12)
R3: BLO sc around (12)
R4–R7: sc around (12)
FO.
Bucket Handle
Using black yarn:
ch 18
FO, leaving tails at both ends.
Attach one end to each side of the bucket.
Jack-O’-Lantern Face
Use black embroidery thread to add simple triangular eyes and a small smiling mouth.
Position the bucket between the panda’s arms and stitch it lightly into place.
5. Little Ghost Panda
This panda wears a removable cream-colored ghost cape while its black ears peek through.
Make the standard panda first.
Ghost Cape
Using cream yarn:
ch 31
Row 1: 30 sc
Row 2: (4 sc, inc) × 6 (36)
Row 3: sc across (36)
Row 4: (5 sc, inc) × 6 (42)
Rows 5–10: sc across (42)
Create a wavy bottom edge:
sl st, skip 1, 5 dc in next stitch, skip 1, sl st
Repeat across.
FO.
Wrap the cape around the panda’s shoulders, leaving the face visible.
For an extra Halloween detail, crochet a tiny orange bow to attach near the neck.
6. Black Cat Costume Panda
This design combines two cute animals by giving the panda a black cat hood.
Make the basic panda from Idea 1.
Cat Hood Base
Using black:
ch 31
Join carefully with a sl st without twisting.
R1–R7: sc around (30)
Check the size against your panda’s head. The hood should frame the face without covering the eye patches.
Cat Ears
Make 2.
R1: 4 sc in MR (4)
R2: (1 sc, inc) × 2 (6)
R3: (2 sc, inc) × 2 (8)
R4: (3 sc, inc) × 2 (10)
FO and flatten.
Sew the two ears onto the top of the hood.
You can embroider a small orange inner-ear detail for a Halloween color accent.
7. Mini Pumpkin Hugging Panda
For the final idea, create a smaller panda holding an oversized pumpkin. This works especially well as a shelf decoration.
Mini Panda Head
With cream:
R1: 6 sc in MR (6)
R2: inc × 6 (12)
R3: (1 sc, inc) × 6 (18)
R4: (2 sc, inc) × 6 (24)
R5: (3 sc, inc) × 6 (30)
R6–R11: sc around (30)
R12: (3 sc, dec) × 6 (24)
R13: (2 sc, dec) × 6 (18)
Stuff.
R14: (1 sc, dec) × 6 (12)
R15: dec × 6 (6)
Close.
Make proportionally smaller ears and eye patches using the same basic techniques from Idea 1.
Mini Body
R1: 6 sc in MR (6)
R2: inc × 6 (12)
R3: (1 sc, inc) × 6 (18)
R4–R8: sc around (18)
R9: (1 sc, dec) × 6 (12)
Stuff and FO.
Long Hugging Arms
Using black, make 2:
R1: 6 sc in MR
R2: inc × 6 (12)
R3–R10: sc around (12)
Stuff lightly.
The longer arms allow you to curve them naturally around the pumpkin.
Large Pumpkin
With orange:
R1: 6 sc in MR (6)
R2: inc × 6 (12)
R3: (1 sc, inc) × 6 (18)
R4: (2 sc, inc) × 6 (24)
R5: (3 sc, inc) × 6 (30)
R6–R10: sc around (30)
R11: (3 sc, dec) × 6 (24)
R12: (2 sc, dec) × 6 (18)
Stuff.
R13: (1 sc, dec) × 6 (12)
R14: dec × 6 (6)
Close and shape the pumpkin into sections using a long strand of orange yarn.
Sew it against the panda’s belly and position both arms around it.
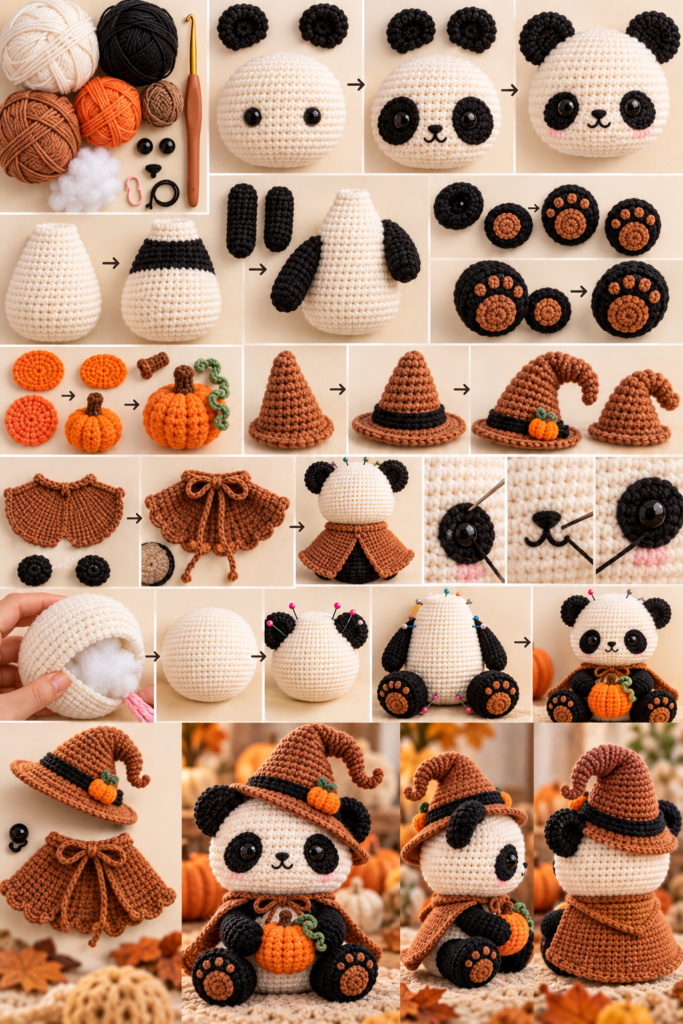
How to Assemble Your Halloween Panda
Assembly can make a big difference in the final appearance, so pin the pieces before sewing.
Start by positioning the ears symmetrically on the head. Next, place the eye patches and check that there is enough room for the nose and mouth.
Sew the head securely onto the body.
Position the legs toward the front if you want the panda to sit like the reference design. Attach the arms slightly forward whenever the panda will be holding a pumpkin or candy bucket.
Finally, add the Halloween accessories. Adjust the hat, cape, pumpkin, or costume before securing anything permanently.
Best Yarn Colors for Halloween Panda Amigurumi
The classic combination of cream, black, pumpkin orange, and warm brown works especially well for the cozy panda shown in the inspiration image.
For a more traditional Halloween palette, combine black, orange, purple, and green.
For a softer Pinterest-style aesthetic, try cream, muted pumpkin orange, caramel brown, dusty peach, and black.
Beginner Tips for Better Amigurumi
Keep your stitches tight enough that the stuffing does not show through. A slightly smaller crochet hook can help if your stitches naturally come out loose.
Use a stitch marker on every round, especially when working continuously.
Stuff the panda gradually. The head should be firm enough to hold its shape, while the arms can remain softer.
Pin the facial pieces before sewing them down. The placement of the eye patches, ears, and nose has a major effect on the panda’s expression.
When adding accessories such as pumpkins or hats, avoid sewing them permanently until you are happy with their position.
For a panda intended for a baby or very young child, use securely embroidered facial features rather than detachable plastic eyes.
Frequently Asked Questions
Is this Halloween panda suitable for beginners?
Yes. The project mainly uses basic amigurumi techniques including single crochet, increases, decreases, magic rings, and simple assembly. The witch hat and costume details add a little extra practice without requiring highly advanced stitches.
What yarn should I use?
Cotton or cotton-blend yarn gives you clear stitches and defined shapes. Soft chenille yarn can create a plush panda, but the stitches can be harder for beginners to see.
Can I make the panda larger?
Yes. The easiest approach is to use thicker yarn with an appropriately sized hook. This keeps the general proportions similar while producing a larger finished amigurumi.
Can I change the Halloween accessories?
Absolutely. The panda base can be reused with different accessories, including pumpkins, witch hats, ghost capes, candy buckets, autumn leaves, or other seasonal decorations.
Should I use safety eyes?
Safety eyes can create the glossy appearance seen in many amigurumi projects, but embroidered eyes are a better option when making toys for babies or very young children.
Final Thoughts
These Easy Crochet Halloween Panda Pattern Ideas for Beginners let you start with one adorable panda concept and turn it into several different Halloween characters.
The witch panda with its brown hat, cape, and pumpkin creates a particularly cozy autumn look, while the pumpkin costume, purple witch, ghost, cat costume, and trick-or-treat variations give you plenty of ways to customize your project.
Once you understand the basic panda construction, experiment with different yarn colors and accessories to create your own Halloween amigurumi collection.