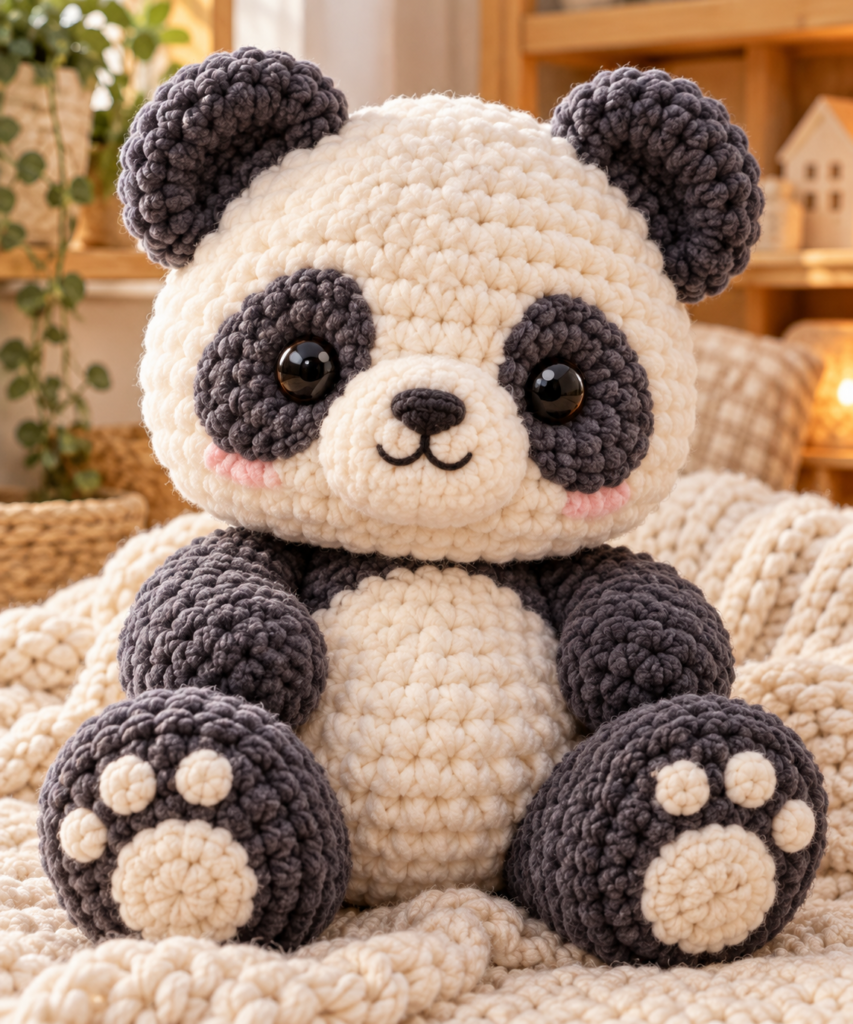
If you are looking for Easy Crochet Panda Pattern Ideas for Beginners, these soft and cuddly amigurumi pandas are a great place to start. Their simple rounded shapes, contrasting black-and-white details, oversized paws, and sweet faces make them perfect for practicing basic amigurumi techniques.
For the extra-plush look in the inspiration photo, chenille or blanket-style yarn works especially well. You can also use regular cotton yarn if you prefer smaller pandas with more visible stitch definition.
Below are 7 beginner-friendly crochet panda ideas. Each panda includes crochet instructions using standard abbreviations such as MR, sc, inc, and dec, so you can actually crochet each design rather than using the ideas only as visual inspiration.
Crochet Abbreviations
MR = Magic Ring
sc = Single Crochet
inc = Increase — 2 sc in the same stitch
dec = Invisible decrease
ch = Chain
sl st = Slip stitch
BLO = Back loop only
FO = Fasten off
Numbers in parentheses show the total stitch count at the end of each round.
1. Classic Chunky Crochet Panda
This first panda is inspired by the plush style in the reference image. It has a large cream head, gray eye patches and ears, a round belly, chunky arms, and oversized feet.
Materials
- Cream or white chenille yarn
- Dark gray chenille yarn
- Crochet hook suitable for your yarn
- Fiberfill
- Yarn needle
- Stitch marker
- Scissors
- Black embroidery yarn
- Optional safety eyes and safety nose
Head
Using cream yarn:
R1: 6 sc in MR (6)
R2: inc × 6 (12)
R3: (1 sc, inc) × 6 (18)
R4: (2 sc, inc) × 6 (24)
R5: (3 sc, inc) × 6 (30)
R6: (4 sc, inc) × 6 (36)
R7: (5 sc, inc) × 6 (42)
R8: (6 sc, inc) × 6 (48)
R9–R15: sc around (48)
R16: (6 sc, dec) × 6 (42)
R17: (5 sc, dec) × 6 (36)
R18: (4 sc, dec) × 6 (30)
R19: (3 sc, dec) × 6 (24)
Begin stuffing.
R20: (2 sc, dec) × 6 (18)
R21: (1 sc, dec) × 6 (12)
R22: dec × 6 (6)
Finish stuffing, FO, and close the opening.
Eye Patches
Make 2 using gray.
R1: 6 sc in MR (6)
R2: inc × 6 (12)
R3: (1 sc, inc) × 6 (18)
FO with a long sewing tail.
Instead of keeping the circles perfectly round, gently stretch them into oval shapes while sewing them onto the face.
Place an eye in the center of each patch.
Ears
Make 2 with gray yarn.
R1: 6 sc in MR (6)
R2: inc × 6 (12)
R3: (1 sc, inc) × 6 (18)
R4–R5: sc around (18)
FO.
Do not stuff heavily. Flatten each ear slightly and sew to the upper sides of the head.
Muzzle
Using cream:
R1: 6 sc in MR (6)
R2: inc × 6 (12)
R3: (1 sc, inc) × 6 (18)
R4: sc around (18)
FO with a long tail.
Add a tiny amount of stuffing and sew the muzzle between and slightly below the eyes.
Embroider the nose and a short mouth line.
Round Panda Body
Start with cream.
R1: 6 sc in MR (6)
R2: inc × 6 (12)
R3: (1 sc, inc) × 6 (18)
R4: (2 sc, inc) × 6 (24)
R5: (3 sc, inc) × 6 (30)
R6: (4 sc, inc) × 6 (36)
R7–R12: sc around (36)
Switch to gray.
R13–R15: sc around (36)
R16: (4 sc, dec) × 6 (30)
R17: (3 sc, dec) × 6 (24)
R18: (2 sc, dec) × 6 (18)
Stuff firmly.
FO with a long sewing tail.
When assembling, position the gray section near the shoulders and the cream belly toward the front.
Chunky Arms
Make 2 in gray.
R1: 6 sc in MR (6)
R2: inc × 6 (12)
R3: (1 sc, inc) × 6 (18)
R4–R9: sc around (18)
R10: (1 sc, dec) × 6 (12)
R11–R13: sc around (12)
Stuff the lower two-thirds.
Flatten the opening and FO.
Sew each arm to the side of the upper body.
Oversized Legs
Make 2 using gray.
R1: 6 sc in MR (6)
R2: inc × 6 (12)
R3: (1 sc, inc) × 6 (18)
R4: (2 sc, inc) × 6 (24)
R5–R8: sc around (24)
R9: (2 sc, dec) × 6 (18)
R10–R12: sc around (18)
Stuff firmly, especially around the rounded foot.
FO and sew both legs toward the front of the body so the panda sits naturally.
Assembly
Sew the head securely onto the body. Pin both ears before attaching them permanently.
Position the eye patches symmetrically and add the muzzle between them.
Attach the arms slightly toward the front and place the large feet on either side of the belly.
The oversized paws are what give this panda its extra-cuddly appearance.
2. Baby Panda Amigurumi
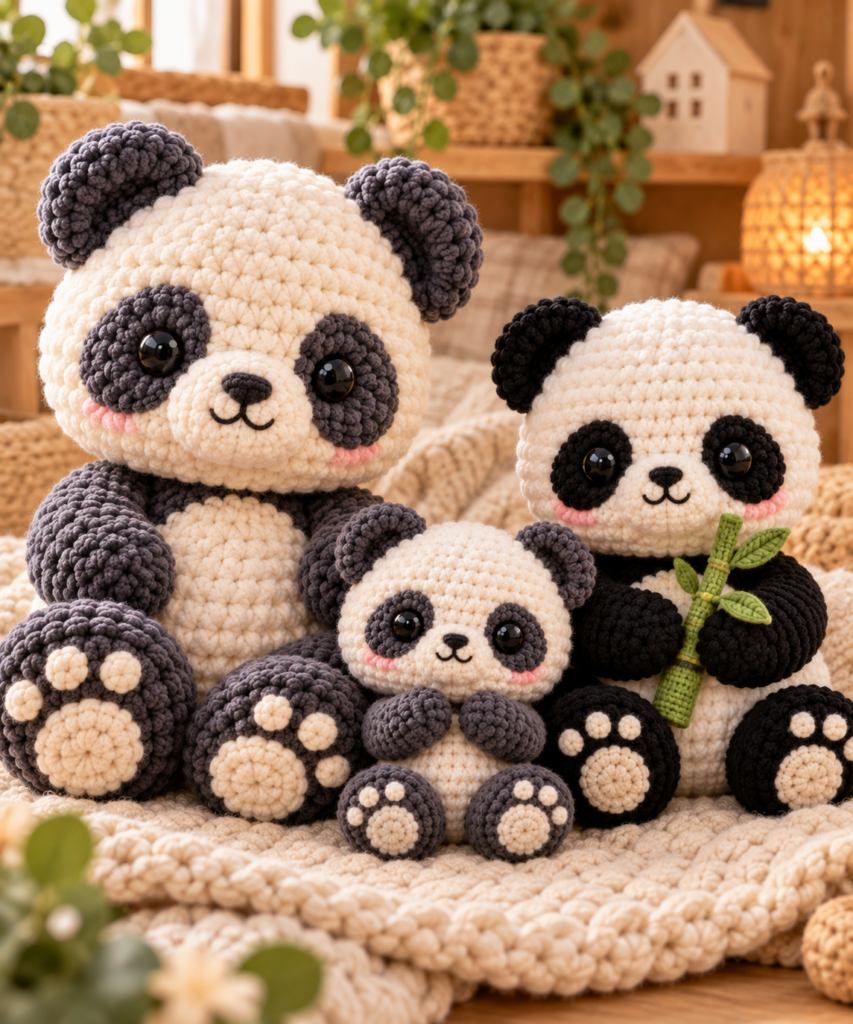
This version uses a larger head and smaller body for a cute baby-panda proportion.
Baby Panda Head
With white:
R1: 6 sc in MR (6)
R2: inc × 6 (12)
R3: (1 sc, inc) × 6 (18)
R4: (2 sc, inc) × 6 (24)
R5: (3 sc, inc) × 6 (30)
R6: (4 sc, inc) × 6 (36)
R7–R13: sc around (36)
R14: (4 sc, dec) × 6 (30)
R15: (3 sc, dec) × 6 (24)
R16: (2 sc, dec) × 6 (18)
Stuff.
R17: (1 sc, dec) × 6 (12)
R18: dec × 6 (6)
FO and close.
Small Body
Start in black or gray:
R1: 6 sc in MR (6)
R2: inc × 6 (12)
R3: (1 sc, inc) × 6 (18)
R4: (2 sc, inc) × 6 (24)
R5–R7: sc around (24)
Change to white.
R8–R11: sc around (24)
R12: (2 sc, dec) × 6 (18)
R13: (1 sc, dec) × 6 (12)
Stuff and FO.
Use smaller versions of the ears, eye patches, arms, and legs from Panda 1.
The large head compared with the body creates the baby-like appearance.
3. Sitting Panda With Giant Paws
For this panda, the feet become the main visual feature.
Crochet the head and body using the instructions from Panda 1.
Giant Panda Feet
Make 2 in dark gray or black.
R1: 6 sc in MR (6)
R2: inc × 6 (12)
R3: (1 sc, inc) × 6 (18)
R4: (2 sc, inc) × 6 (24)
R5: (3 sc, inc) × 6 (30)
R6–R9: sc around (30)
R10: (3 sc, dec) × 6 (24)
R11: (2 sc, dec) × 6 (18)
R12: sc around (18)
Stuff firmly.
FO with a long sewing tail.
Paw Pads
Make 2 large pads in cream:
R1: 6 sc in MR
R2: inc × 6 (12)
R3: (1 sc, inc) × 6 (18)
FO.
For each foot, make 3 tiny toe pads:
R1: 6 sc in MR.
Close immediately.
Sew the large pad to the middle of each foot and arrange the three small pads above it.
Place both feet facing forward when attaching them to the panda.
4. Mini Pocket Panda
This smaller version is perfect if you want a quicker crochet panda project.
Head
With white:
R1: 6 sc in MR (6)
R2: inc × 6 (12)
R3: (1 sc, inc) × 6 (18)
R4: (2 sc, inc) × 6 (24)
R5–R9: sc around (24)
R10: (2 sc, dec) × 6 (18)
R11: (1 sc, dec) × 6 (12)
Stuff.
R12: dec × 6 (6)
Close.
Body
With black:
R1: 6 sc in MR
R2: inc × 6 (12)
R3: (1 sc, inc) × 6 (18)
Change to white.
R4–R8: sc around (18)
R9: (1 sc, dec) × 6 (12)
Stuff and close.
Tiny Arms
Make 2 in black.
R1: 6 sc in MR
R2–R6: sc around (6)
FO.
Tiny Legs
Make 2.
R1: 6 sc in MR
R2: inc × 6 (12)
R3–R5: sc around (12)
Stuff lightly and attach to the body.
Add tiny ears and embroidered eye patches to finish your mini panda.
5. Sleepy Crochet Panda
A sleepy panda looks especially cute with closed embroidered eyes instead of plastic eyes.
Use the basic head from Panda 1.
Sleepy Eye Patches
Make two gray patches:
R1: 6 sc in MR
R2: inc × 6 (12)
R3: (1 sc, inc) × 6 (18)
Sew them onto the head.
Using black embroidery thread, create a simple curved closed-eye line across each patch.
Add two or three tiny lashes toward the outside if desired.
Sleepy Body
With cream:
R1: 6 sc in MR
R2: inc × 6 (12)
R3: (1 sc, inc) × 6 (18)
R4: (2 sc, inc) × 6 (24)
R5: (3 sc, inc) × 6 (30)
R6–R11: sc around (30)
R12: (3 sc, dec) × 6 (24)
R13: (2 sc, dec) × 6 (18)
Stuff and FO.
Make gray arms and legs using the corresponding instructions from Panda 1.
Position the arms slightly inward across the belly for a cozy sleepy pose.
6. Panda With a Tiny Bamboo Stem
This version keeps the panda classic but adds a recognizable bamboo accessory.
Make your panda using the Classic Chunky Panda instructions.
Bamboo Stem
Using green yarn:
R1: 6 sc in MR (6)
R2–R14: sc around (6)
Stuff only if your yarn is very soft.
FO.
Bamboo Leaves
Make 3–4.
ch 6
Starting in second chain:
sl st, sc, hdc, sc, sl st
FO.
Sew the leaves at different points along the stem.
Place the bamboo diagonally across the panda’s belly and position both arms around it.
Use a few small stitches to secure it.
7. Pastel Gray and Cream Panda
The final idea is ideal for a soft neutral aesthetic similar to the inspiration photo.
Instead of strong black and bright white, use charcoal gray and warm cream chenille yarn.
Follow the full Classic Chunky Panda construction, but add an extra cream belly patch.
Belly Patch
Using cream:
R1: 6 sc in MR (6)
R2: inc × 6 (12)
R3: (1 sc, inc) × 6 (18)
R4: (2 sc, inc) × 6 (24)
R5: (3 sc, inc) × 6 (30)
FO with a long tail.
Stretch the circle gently into an oval while sewing it onto the front of the body.
For an even softer appearance, add subtle pink embroidered cheek details beneath the eyes.
How to Assemble Your Crochet Panda
Before sewing anything permanently, use pins to test the placement of the panda’s pieces.
Attach the head to the body first. Next, position both ears at the upper sides of the head.
Place the eye patches before adding the eyes because this makes it much easier to keep the face symmetrical.
Attach the arms near the shoulders. For a sitting panda, position the legs low and toward the front so the feet remain clearly visible.
Finally, add the muzzle, nose, mouth, paw pads, bamboo, or other accessories.
Best Yarn for a Crochet Panda
For a plush panda like the one in the inspiration image, chenille or blanket yarn creates a very soft and fluffy result.
Cotton yarn is another good option for beginners because the individual stitches are easier to see.
If you are still learning amigurumi, consider practicing the basic panda with cotton yarn before moving to fluffy chenille.
Best Panda Color Combinations
You do not have to use pure black and white.
Classic Panda: Black + white
Soft Neutral Panda: Charcoal gray + warm cream
Baby Panda: Soft gray + ivory
Pastel Panda: Light gray + cream + blush details
Modern Panda: Dark charcoal + off-white
The gray-and-cream combination is particularly useful when you want a softer handmade aesthetic.
Beginner Tips
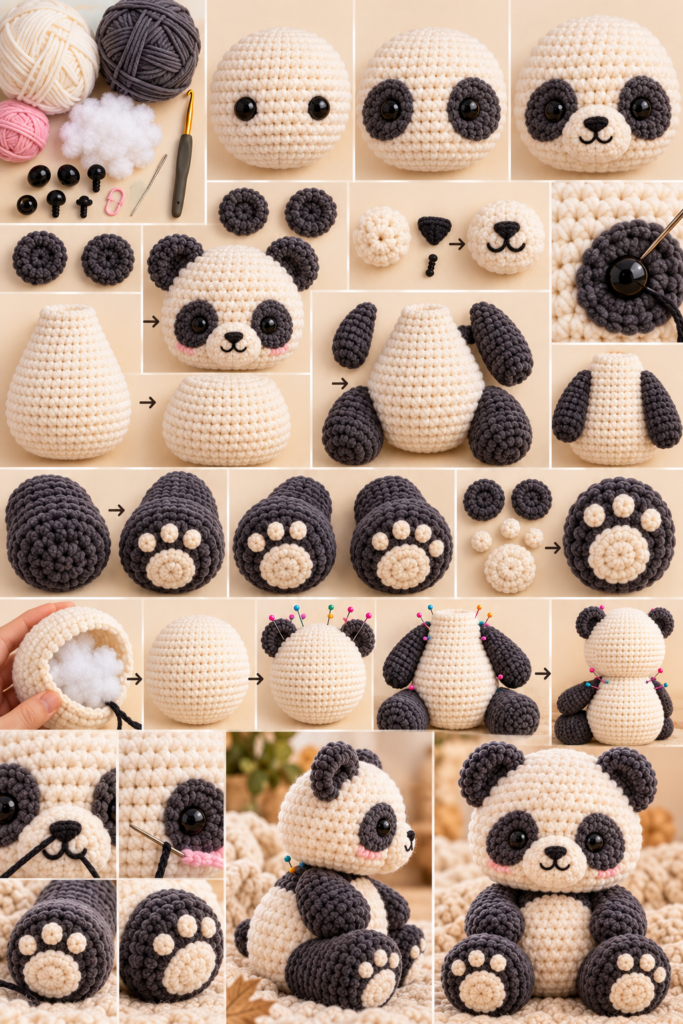
Use a stitch marker to mark the beginning of every round because most amigurumi pieces are worked continuously.
Keep your tension consistent. Your stitches should be tight enough that the stuffing does not become visible.
Stuff the head gradually and distribute the fiberfill evenly with your fingers.
Do not overstuff the arms. Slightly softer arms are easier to position naturally against the panda’s body.
When using chenille yarn, count your stitches carefully because the fluffy fibers can make individual stitches harder to see.
Always pin the ears, eye patches, muzzle, arms, and legs before sewing.
For pandas intended for babies or very young children, embroidered facial features are preferable to detachable plastic pieces.
Frequently Asked Questions
Is a crochet panda easy for beginners?
Yes. A simple panda amigurumi uses many standard beginner techniques, including magic rings, single crochet, increases, decreases, stuffing, and sewing pieces together.
What yarn creates the fluffy panda look?
Chenille and blanket-style yarns are excellent for creating a soft plush panda. Cotton yarn produces a smaller, more defined amigurumi appearance.
Why does my panda have gaps between the stitches?
Your hook may be too large for your yarn or your tension may be too loose. Try a slightly smaller hook while keeping your stitches comfortable to work.
Can I make the panda bigger?
Yes. Using thicker yarn and a suitable larger hook is an easy way to increase the finished size without changing every round of the pattern.
Can beginners use chenille yarn?
Yes, although it can be more difficult to see the stitches. Stitch markers and careful counting make working with fluffy yarn much easier.
Can I use embroidered eyes?
Absolutely. Embroidered eyes can create an adorable expression and are especially appropriate when the finished panda is intended for a baby or young child.
Final Thoughts
These Easy Crochet Panda Pattern Ideas for Beginners give you several ways to turn the same adorable animal into completely different amigurumi projects.
Start with the chunky gray-and-cream panda if you love the plush appearance of the inspiration photo. Once you understand the basic construction, try the baby panda, oversized-paw panda, mini version, sleepy panda, bamboo panda, or neutral pastel variation.
Changing the proportions, yarn texture, facial expression, and accessories is often all you need to make every crochet panda feel unique.