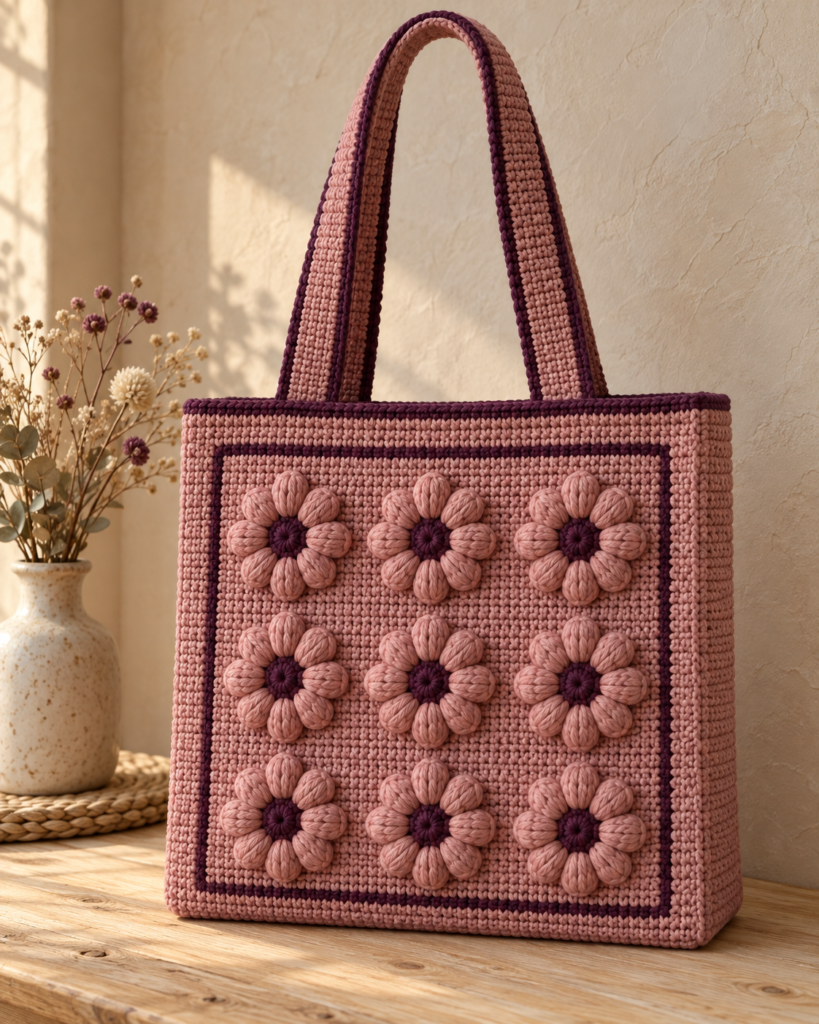
A dusty rose puff flower tote brings soft color and beautiful texture to an everyday crochet bag. With raised flowers, dark plum centers, and sturdy handles, this project turns simple crochet fabric into a charming handmade accessory.
The reference image pairs a softly structured rose-colored bag with nine dimensional flowers arranged in three rows. Deep mauve edging frames the floral panel and outlines the handles, giving the gentle pink palette a little extra definition.
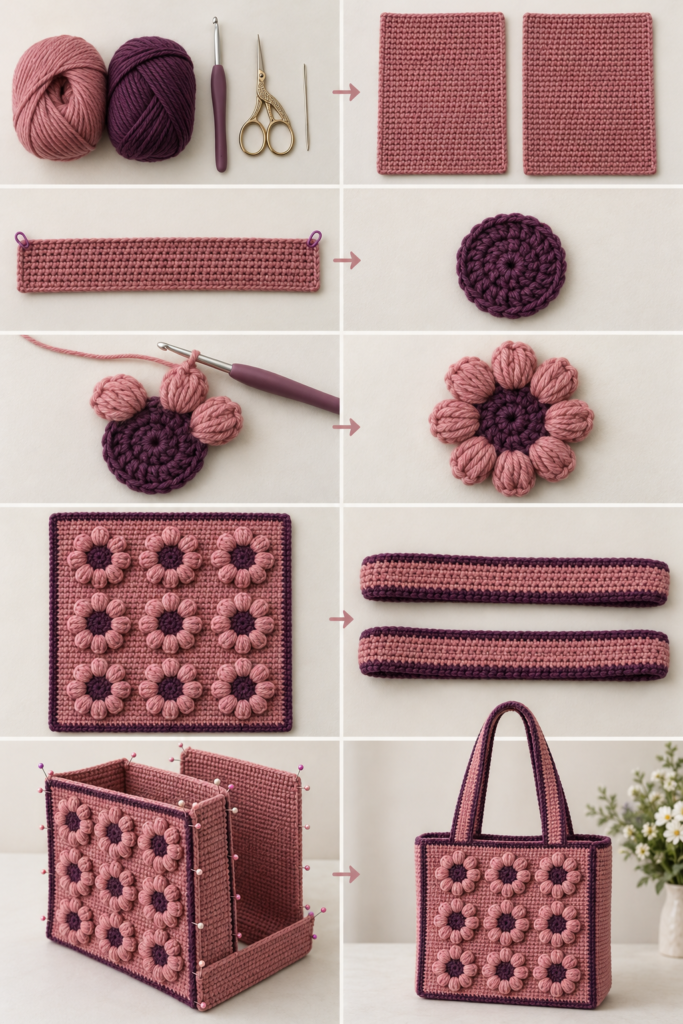
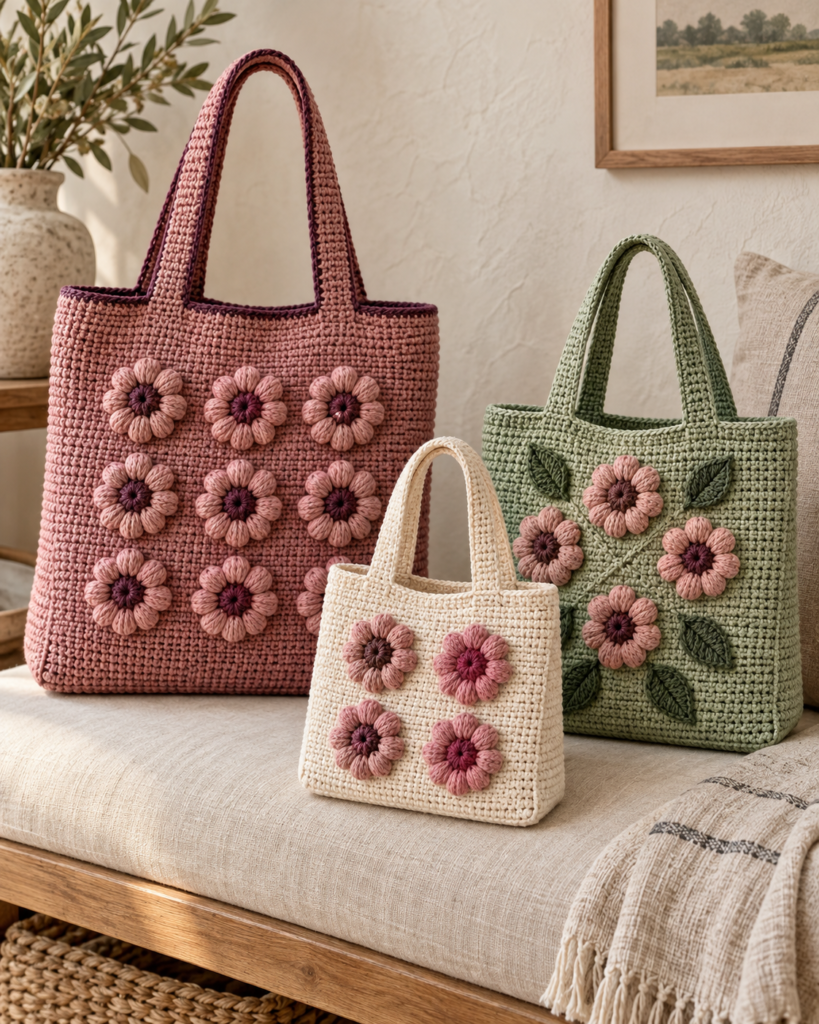
The first tutorial below offers an original interpretation of that look using a solid crochet tote with individually sewn puff flowers. Six additional versions explore different sizes, flower arrangements, and finishing details. You’ll practice working flat panels, making dimensional petals, and assembling a useful bag.
These are original, untested written patterns inspired by the photo’s general appearance. Measurements and yarn quantities are estimates; check your gauge and the size of your first flower before making all the pieces.
Crochet Abbreviations
All instructions use US crochet terminology.
- ch = chain
- sc = single crochet
- hdc = half double crochet
- dc = double crochet
- sl st = slip stitch
- st/sts = stitch/stitches
- MR = magic ring
- RS = right side
- FO = fasten off
Numbers in parentheses give the stitch count at the end of a row or round. Where a count refers to petals or spaces, it is labeled accordingly.
Turning chains: The ch 1 at the beginning of a row does not count as a stitch.
Puff stitch: Yarn over, insert the hook into the indicated stitch, yarn over, and pull up a loop to approximately the height of a double crochet. Repeat this movement four more times in the same stitch. You will have 11 loops on your hook. Yarn over and pull through all 11 loops, then ch 1 to secure. This securing chain is part of the puff stitch.
Adjustable ring alternative: If you prefer not to use a magic ring, ch 4 and sl st into the first chain to form a ring. Work the indicated stitches into its center.
1. Classic Dusty Rose Puff Flower Tote
This version echoes the reference with a rose-colored body, nine raised flowers, plum centers, and dark edging. Its solid front supports the flowers without requiring individual floral squares.
Materials
- Approximately 550–700 yards of worsted-weight cotton yarn in dusty rose
- Approximately 100–150 yards of worsted-weight cotton yarn in deep plum
- A 4 mm crochet hook, or the size needed for gauge
- Yarn needle
- Stitch markers
- Scissors
- Measuring tape
- Optional woven fabric, sewing needle, and thread for a lining
The estimates include the body, flowers, handles, seams, and trim.
Finished Size and Gauge
Aim for 16 sc and 18 rows = 4 inches, measured over a gently blocked single crochet swatch.
The main panels measure approximately 12¼ inches wide × 12 inches tall. A separate gusset adds about 2½ inches of depth.
The handles are approximately 20 inches long before attachment. Sewing down 2 inches at each end leaves about 16 inches of free handle length.
Front and Back Panels
Make two in dusty rose.
Row 1: Ch 50. Starting in the second ch from the hook, sc in each ch across. (49)
Rows 2–54: Ch 1, turn, sc in each st across. (49)
FO and weave in the ends.
Mark the RS of each panel. Designate one panel as the front.
Side and Bottom Gusset
Make one long strip in dusty rose.
Row 1: Ch 11. Starting in the second ch from the hook, sc across. (10)
Row 2: Ch 1, turn, sc across. (10)
Rows 3 onward: Repeat Row 2 until the strip fits down one side of a main panel, across its bottom, and up the other side.
At the stated gauge, this is approximately 36¼ inches, or about 163 rows in total. Use the actual panel edges to determine the final length.
Place markers on the strip where it reaches each bottom corner. Do not stretch the strip while measuring.
FO.
Flower Centers
Make nine in deep plum.
Round 1: Work 8 sc in an MR. Pull the ring closed and sl st into the first sc. (8)
Round 2: Ch 1, work 2 sc in each st around. Sl st into the first sc. (16)
FO.
Puff Petals
With the center’s RS facing you, join dusty rose in any stitch of Round 2.
Round 3: Repeat the following sequence eight times:
Ch 2, work 1 puff stitch in the same stitch where the yarn is currently attached, ch 2, sl st into the next stitch, then sl st into the following stitch.
The final slip stitch lands in the stitch where the round began. (8 petals)
FO, leaving an 18-inch sewing tail.
Each petal uses a pair of center stitches: the puff grows from the first, and the second anchors its outer edge. The following slip stitch moves you into position for the next petal.
Aim for flowers approximately 2¾–3 inches across. Make one first. If it exceeds 3¼ inches, try a smaller hook for the flowers so the nine-flower arrangement fits comfortably.
Arrange the Floral Panel
Lay the front panel flat with its RS facing up.
Arrange the flowers in three rows of three. As a starting guide, place their centers:
- Approximately 2½, 6⅛, and 9¾ inches from the left edge
- Approximately 2½, 6, and 9½ inches above the bottom edge
Adjust the spacing so the petals sit comfortably inside the panel.
Pin or loosely baste every flower before sewing. Stitch through the flower center’s outer round and the front panel, then add a small anchoring stitch beneath each petal. Keep the puff tops free to preserve their raised appearance.
Plum Frame
Use a chain cord to create a simple frame around the flowers.
With deep plum, make a chain long enough to sit approximately ½ inch inside the front panel’s perimeter. Check its length against the fabric without stretching it.
FO. Pin the chain into a rectangle and sew it down with matching yarn, catching every second or third chain. Ease the chain around each corner.
This creates a dark border without requiring surface crochet.
Handles
Make two in dusty rose.
Row 1: Ch 8. Starting in the second ch from the hook, sc across. (7)
Rows 2–90: Ch 1, turn, sc across. (7)
FO.
For the edging, join deep plum at one corner.
Ch 1 and sc around the handle, placing approximately 1 sc into each row end along the long sides and 1 sc into each stitch across the short ends. Work 3 sc at each corner, counting the corner only once.
Sl st into the first sc and FO.
If the edging ripples, use fewer stitches along the row ends. If it pulls the handle into a curve, add a few evenly spaced stitches.
Assemble the Bag
With the outer surfaces facing out, pin one long edge of the gusset to the front panel’s two side edges and bottom edge. Match the corner markers.
Whipstitch the edges together using dusty rose. Keep the seam firm but flexible.
Repeat with the back panel and the other long edge of the gusset.
For the top edging, join deep plum at a side seam.
Top Round 1: Ch 1, sc evenly around the opening, working into every stitch across the front and back and evenly across the short gusset ends. Sl st into the first sc.
Top Round 2: Ch 1, sc in each st around. Sl st into the first sc and FO.
On each panel, position the handle ends approximately 2½ inches in from the side seams. Overlap each end onto the outside of the bag by 2 inches.
Sew around each overlap in a rectangle, then sew an X inside that rectangle. Take several secure stitches through the handle and bag fabric.
2. Cream and Rose Mini Flower Tote
A smaller cream tote with four dusty rose flowers makes a sweet bag for a notebook, small project, or a few daily essentials.
Materials and Size
Use approximately 250–350 yards of cream cotton, 60–90 yards of dusty rose, and 25–40 yards of plum.
At the main gauge, the panels measure approximately 8¼ × 8 inches.
Mini Panels
Make two in cream.
Row 1: Ch 34. Starting in the second ch from the hook, sc across. (33)
Rows 2–36: Ch 1, turn, sc across. (33)
FO.
Mini Gusset
In cream:
Row 1: Ch 9. Starting in the second ch from the hook, sc across. (8)
Row 2: Ch 1, turn, sc across. (8)
Repeat Row 2 until the strip fits the two side edges and bottom of one panel, approximately 24¼ inches.
FO.
Flowers
Make four flowers using the Flower Centers and Puff Petals instructions from Idea #1.
Use plum centers and dusty rose petals.
Arrange them in a two-by-two grid. Position the centers approximately 2¼ and 6 inches from the left edge, and 2¼ and 5¾ inches above the bottom.
Sew them down as described in Idea #1.
Short Handles
Make two in cream.
Row 1: Ch 6. Starting in the second ch from the hook, sc across. (5)
Rows 2–63: Ch 1, turn, sc across. (5)
FO.
These handles measure about 14 inches before attachment.
Assemble the tote using Idea #1. Work the two top edging rounds in dusty rose. Attach each handle with a 1½-inch overlap, positioning the ends approximately 1½ inches from the side seams.
3. Sage Garden Tote with Leaves
Dusty rose flowers and pointed sage leaves create a garden-inspired variation with more open space around the decoration.
Bag and Handles
Follow the panels, gusset, and handles from Idea #1, using sage green for the bag and dusty rose for the handle edging and top border.
Omit the rectangular chain frame.
Flowers
Make five flowers following Idea #1, using cream centers and dusty rose petals.
Arrange three flowers across the lower third of the front. Place two more above the gaps between them.
Leave at least 1½ inches between the uppermost petals and the bag opening.
Leaves
Make six in a darker sage yarn.
Round 1: Ch 9. Starting in the second ch from the hook, work:
1 sc, 1 hdc, 1 dc in each of the next 3 ch, 1 hdc, 1 sc, then 3 sc in the last ch.
Rotate to work along the unused side of the foundation chain. Work:
1 sc, 1 hdc, 1 dc in each of the next 3 ch, 1 hdc, 1 sc.
Sl st into the first sc. (17)
FO, leaving a sewing tail.
Assembly
Place the leaves beneath the flower edges, with their tips pointing outward. Hide approximately ½ inch of each leaf base under a flower.
Sew along each leaf’s center and around its base. Leave the outer edges slightly free for gentle dimension.
Sew down the flowers, then assemble the tote and attach its handles following Idea #1.
4. Oversized Single-Bloom Tote
A large flower becomes the focal point of this version. Longer petals create a flatter bloom that spreads across the front without the bulk of nine separate flowers.
Bag
Make the full-size panels, gusset, and handles from Idea #1 in dusty rose.
Use plum for the top edging and handle edging. Omit the small flowers and chain frame.
Large Flower Center
Use deep plum.
Round 1: Work 8 sc in an MR. Join with a sl st. (8)
Round 2: Ch 1, work 2 sc in each st around. Join. (16)
Round 3: Ch 1, repeat [1 sc, 2 sc in the next st] eight times. Join. (24)
FO.
Long Petals
Join dusty rose in any stitch of Round 3.
For each petal:
Ch 10. Starting in the second ch from the hook, work 1 sc, 1 hdc, 1 dc in each of the next 5 ch, 1 hdc, and 1 sc. (9 stitches along the chain)
Sl st into the next stitch of the flower center, then sl st into the following stitch to begin the next petal.
Repeat until you have made 12 petals. The final slip stitch returns to the starting stitch.
FO, leaving a long sewing tail.
Placement and Assembly
Center the bloom on the front panel. Curve all petals slightly in the same direction to create a soft pinwheel effect.
Sew around the center. Add a small stitch beneath each petal halfway along its length and another near its tip.
Complete the bag using Idea #1.
5. Three-Flower Pocket Tote
This practical variation places three puff flowers across the upper front and adds an exterior pocket beneath them.
Main Bag
Make the full-size panels, gusset, and handles from Idea #1 in dusty rose.
Omit the nine-flower arrangement and chain frame.
Front Pocket
Use deep plum.
Row 1: Ch 26. Starting in the second ch from the hook, sc across. (25)
Rows 2–22: Ch 1, turn, sc across. (25)
Change to dusty rose.
Rows 23–24: Ch 1, turn, sc across. (25)
FO, leaving a long sewing tail.
The pocket measures approximately 6¼ inches wide × 5⅓ inches tall.
Attach the Pocket
Center the pocket horizontally on the front panel with its bottom approximately 1 inch above the panel’s lower edge.
Sew down both sides and across the bottom. Leave the top open. Reinforce both top corners with several extra stitches.
Flower Band
Make three flowers using Idea #1.
Place their centers approximately 2½, 6⅛, and 9¾ inches from the left edge, and approximately 9 inches above the bottom.
Check that their lower petals do not obstruct the pocket opening, then sew them in place.
Assemble the bag and attach the handles following Idea #1.
6. Soft Stripe Puff Flower Tote
Horizontal cream and rose stripes give this tote a lighter appearance. Three flowers form a diagonal accent across the front.
Striped Panels
Make two.
Row 1, dusty rose: Ch 50. Starting in the second ch from the hook, sc across. (49)
Rows 2–6, dusty rose: Ch 1, turn, sc across. (49)
Continue working 49 sc per row with the following colors:
- Rows 7–12: Cream
- Rows 13–18: Dusty rose
- Rows 19–24: Cream
- Rows 25–30: Dusty rose
- Rows 31–36: Cream
- Rows 37–42: Dusty rose
- Rows 43–48: Cream
- Rows 49–54: Dusty rose
For each color change, complete the last yarn-over of the previous row’s final stitch with the new color.
FO and weave in the ends.
Gusset and Handles
Follow Idea #1 using solid dusty rose for the gusset and handles.
Use plum for the handle edging and the two rounds around the opening.
Flowers and Placement
Make three flowers following Idea #1:
- Two with plum centers and dusty rose petals
- One with a dusty rose center and cream petals
Arrange them diagonally across the front. Position their centers approximately:
- 3 inches from the left and 3 inches above the bottom
- 6⅛ inches from the left and 6 inches above the bottom
- 9¼ inches from the left and 9 inches above the bottom
Sew the flowers down before assembling the bag.
7. Drawstring Flower Project Tote
A drawstring closure makes this version useful for carrying a small crochet project. Four flowers decorate the lower front, leaving the opening easy to gather.
Main Pieces
Make the full-size panels, gusset, and handles from Idea #1.
Use dusty rose for the body and handles, with plum handle edging.
Make four flowers from Idea #1 and arrange them in two rows of two on the lower front. Keep the upper edges of the flowers at least 3 inches below the opening.
Sew on the flowers and assemble the body. Do not work the original top edging.
Eyelet Border
Join deep plum at a side seam.
Round 1: Ch 1, sc evenly around the opening. Count your stitches before joining. If the total is odd, work one additional sc into the same final insertion point to make an even count. Sl st into the first sc.
Round 2: Ch 1, repeat [sc in the next st, ch 1, skip the next st] around. Sl st into the first sc.
Round 3: Ch 1, work 1 sc in each sc and 1 sc in each ch-1 space around. Join.
Round 4: Ch 1, sc around. Join and FO.
Round 3 restores the same stitch count as Round 1.
Drawstrings
Make two in dusty rose or cream.
For each cord:
Row 1: Chain until the cord measures approximately 42 inches without stretching.
Row 2: Starting in the second ch from the hook, sl st into each ch across.
FO and secure the ends.
Weave the first cord through the eyelets around the entire opening, bringing both ends out at the left side.
Weave the second cord around the opening in the opposite direction, bringing both ends out at the right side.
Knot each cord’s two ends together. Pull the paired ends on both sides to gather the top.
Handle Attachment
Attach the handles with their upper attachment points below the eyelet border. Sew through the solid body fabric so the drawstrings can move freely.
How to Assemble Your Crochet Flower Tote Neatly
Decorate the front while it is still flat. Sewing flowers, leaves, and pockets becomes much easier when you can reach both sides of the fabric.
For a smooth assembly:
- Gently block the panels to matching dimensions.
- Measure the gusset against the actual panel edges.
- Pin both bottom corners before distributing the remaining fabric.
- Sew each gusset edge without pulling the seam tight.
- Check that the opening sits evenly before adding its border.
- Pin both handles and compare their lengths before sewing.
Weave yarn tails in several directions through the backs of stitches. Trim only after checking that each join is secure.
Optional Fabric Lining
A lining helps keep small items from catching in the crochet fabric and can reduce distortion during use.
For a gusseted lining, measure the finished bag’s interior. Cut two fabric panels to its inner width and height, adding ½-inch seam allowances at the sides and bottom and 1 inch at the top.
Cut a matching gusset strip to the interior depth plus two ½-inch seam allowances. Its length should follow the two side edges and bottom of a lining panel, with allowance at both upper ends.
Sew the lining gusset to both panels. Place the lining inside the tote with its seam allowances facing the crochet fabric. Fold the upper edge under twice and hand-stitch it just below the bag opening.
For Idea #7, attach the lining below the drawstring eyelets.
Best Yarn for a Dusty Rose Puff Flower Tote
Worsted-weight cotton is a practical starting point for these patterns. It gives the stitches definition and helps the raised petals hold their shape.
A cotton blend can also work, but check the fabric before committing to the whole bag. Crochet a swatch, hang it with a little weight, and see whether it stretches more than you want.
Choose a smooth yarn for your first version. Highly textured yarn makes it harder to identify stitches and can obscure the flower centers.
Use the same yarn weight for the body and flowers unless you intentionally want smaller or more delicate embellishments.
Best Color Combinations
These palettes suit the tote’s floral texture:
- Dusty rose and deep plum: Closest to the reference’s soft, vintage appearance.
- Cream, blush, and cocoa: Warm neutrals with gentle contrast.
- Sage, dusty rose, and ivory: A garden-inspired palette.
- Terracotta, oatmeal, and cinnamon: Earthy colors for an autumn variation.
- Lavender, mauve, and eggplant: A richer purple interpretation.
- Denim blue, cream, and mustard: A brighter everyday version.
For defined flowers, choose centers that contrast clearly with the petals.
Beginner Crochet Tips
Make One Flower First
A sample flower tells you more than yarn weight alone. Check its diameter, petal fullness, and how it looks against the body fabric before making the complete set.
Keep Puff Loops Even
Pull every loop in a puff to the same height. Short loops produce tight, stiff petals; uneven loops create lumpy ones.
If pulling through all 11 loops is difficult, rotate the hook slightly downward and ease it through slowly.
Mark the First and Last Stitches
Place a marker in the first and last sc of each panel row. This helps prevent accidental increases and narrowing edges.
Count Before Assembly
Check that both main panels have the same stitch and row counts. Small differences are easier to correct before you attach flowers or sew seams.
Support the Handles
Reinforce the attachment rectangles carefully. For a bag you plan to use often, you can sew woven cotton tape along the underside of each handle, securing its ends within the attachment areas.
Block Without Flattening the Petals
Follow the yarn label’s care directions. Shape the bag panels gently and avoid pressing an iron directly onto the puff flowers.
Frequently Asked Questions
Is this tote suitable for a beginner?
A confident beginner who can chain, single crochet, and sew pieces together can tackle the basic tote. Practice the puff stitch separately before starting the decorative flowers.
Does this pattern reproduce the exact bag in the photo?
No. It creates an original bag with a similar palette, floral arrangement, and contrasting trim. The construction uses appliqué flowers on solid panels.
How much yarn should I buy?
For the full-size classic version, allow approximately 650–850 yards total across both colors. Actual use depends on your gauge, yarn, handle length, and puff size. The mini version requires less.
Can I make the handles longer?
Yes. Continue the handle rows until you reach your desired length, making both handles identical. Remember that the sewn overlaps reduce the free length and that crochet handles may stretch during use.
Do I need a lining?
A lining is optional. It is particularly useful for carrying small items or giving the bag more support. A lining does not replace secure seams and reinforced handle attachments.
How should I wash the finished tote?
Follow the care instructions for both the yarn and any lining fabric. Reshape the damp tote, gently lift the petals with your fingers, and dry it flat rather than hanging it from the handles.
Final Thoughts
A dusty rose puff flower tote combines an approachable bag shape with satisfying floral details. Start with the classic nine-flower design, try a compact cream version, or add a pocket for everyday usefulness.
Taking time to check one flower, fit the gusset, and reinforce the handles will help give your finished tote a neat shape and a comfortable feel.