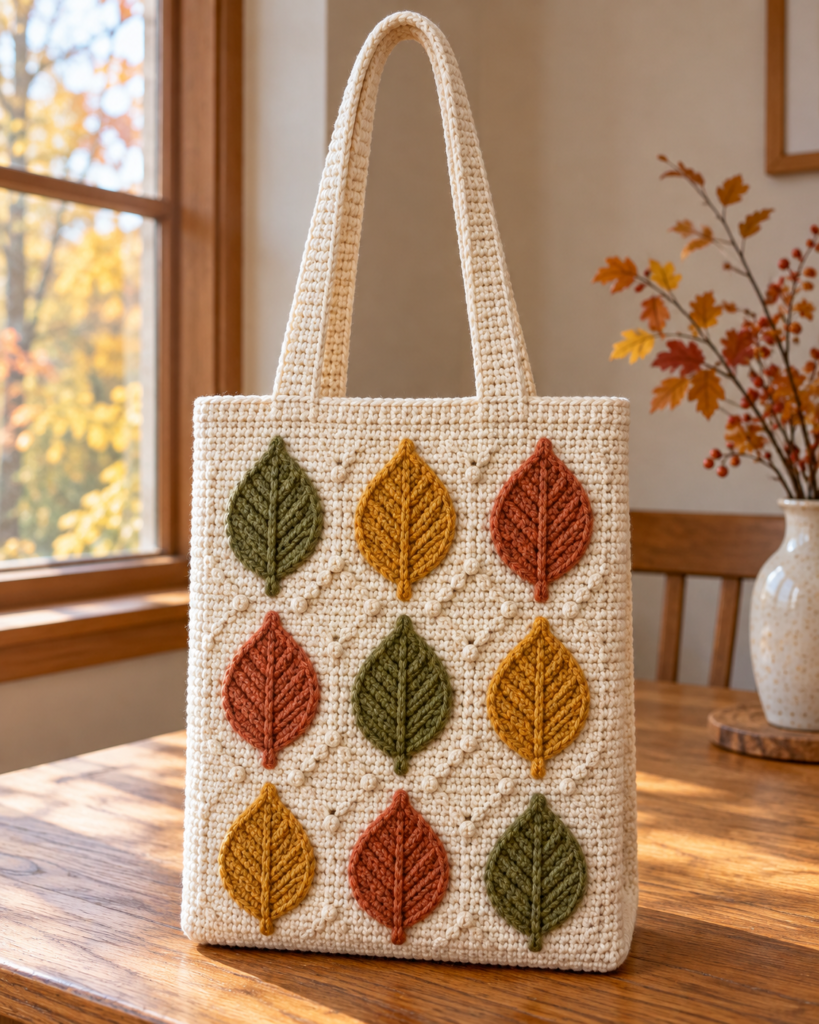
A crochet leaf tote bag brings autumn color to an everyday accessory. Cream yarn, textured leaves, and comfortable handles create a handmade bag that pairs beautifully with cozy sweaters and fall layers.
The inspiration features an oatmeal background covered with raised leaves in olive green, mustard yellow, and rusty orange. Cream detailing separates the motifs, while matching handles keep the overall look soft and simple.
These seven original tutorials explore that seasonal combination through different sizes, layouts, and useful details. Start with the classic nine-leaf tote, then try a mini version, a practical pocket, or a trailing vine.
The patterns use separately crocheted leaves sewn onto solid bag panels. They are original interpretations rather than instructions for reproducing the photographed bag. They have not been physically tested, so check your gauge and sample leaf before making the complete project.
Crochet Abbreviations
All instructions use US crochet terminology.
- ch = chain
- sc = single crochet
- hdc = half double crochet
- dc = double crochet
- sl st = slip stitch
- st/sts = stitch/stitches
- RS = right side
- FO = fasten off
Numbers in parentheses indicate the stitch count at the end of a row or round. Chain spaces are listed separately where needed.
Beginning ch 1 does not count as a stitch.
Picot: Ch 3, then sl st into the first of those three chains. This creates a small point and does not count as an additional stitch in the round.
Working around a chain: Crochet along one side of the foundation chain, work the indicated turning stitches into its last chain, then rotate the piece and crochet into the unused loops on the opposite side.
1. Classic Autumn Leaf Tote
This cream tote is the closest interpretation of the inspiration. Nine pointed leaves bring together olive, mustard, and rust, while optional cream chain outlines suggest the framed texture between the motifs.
Materials
- Approximately 550–700 yards of worsted-weight cotton yarn in oatmeal or cream
- Approximately 40–60 yards each in olive, mustard, and rust
- A 4 mm crochet hook, or the size needed for gauge
- Yarn needle
- Stitch markers
- Scissors
- Measuring tape
- Optional woven cotton fabric and sewing supplies for a lining
Yarn quantities are estimates and depend on gauge, handle length, and embellishments.
Gauge and Finished Size
Aim for 16 sc and 18 rows = 4 inches in gently blocked single crochet.
Each main panel measures approximately 12¼ inches wide × 12 inches tall. The gusset adds approximately 2½ inches of depth.
Make a leaf sample before crocheting the full set. Aim for a finished length of approximately 3–3½ inches, including its stem. Change the leaf hook size if necessary to fit the arrangement.
Front and Back Panels
Make two in cream.
Row 1: Ch 50. Starting in the second ch from the hook, sc in each ch across. (49)
Rows 2–54: Ch 1, turn, sc across. (49)
FO and weave in the ends.
Mark the RS of each panel.
Side and Bottom Gusset
Make one strip in cream.
Row 1: Ch 11. Starting in the second ch from the hook, sc across. (10)
Row 2: Ch 1, turn, sc across. (10)
Repeat Row 2 until the strip fits down one side of a main panel, across the bottom, and up the other side.
The required length is approximately 36¼ inches at the stated gauge, or about 163 rows total. Use the actual panel edges to determine the final length.
Mark the two bottom-corner positions on the gusset. FO.
Pointed Leaf Appliqués
Make nine: three olive, three mustard, and three rust.
Foundation: Ch 11.
Round 1: Starting in the second ch from the hook, work 1 sc, 1 hdc, 1 dc in each of the next 6 ch, and 1 hdc. In the last ch, work [sc, picot, sc].
Rotate to work along the unused side of the foundation chain. Work 1 hdc, 1 dc in each of the next 6 ch, 1 hdc, and 1 sc.
Sl st into the first sc. (20 stitches, plus the picot)
Round 2: Ch 1. Work 1 sc in the first st, 2 sc in the next st, 1 sc in each of the next 6 sts, 2 sc in the next st, and 1 sc in the next st.
At the tip, work [sc, picot, sc] into the opening beneath the previous round’s picot.
Continue with 1 sc in the next st, 2 sc in the next st, 1 sc in each of the next 6 sts, 2 sc in the next st, and 1 sc in the final st.
Sl st into the first sc. (26 stitches, plus the new picot)
Stem: Ch 4. Starting in the second ch from the hook, sl st into each of the next 3 ch. Sl st back into the leaf base.
FO, leaving an approximately 18-inch sewing tail.
Add Leaf Veins
Thread a needle with a separate length of matching yarn, or use a slightly darker shade.
Backstitch along the foundation chain from the stem toward the tip. Keep each stitch approximately ¼ inch long.
Add three short diagonal stitches on each side, extending from the center vein toward the outer edge. Stop before reaching the edging.
Keep the embroidery relaxed so the leaf does not pucker.
Arrange the Leaves
Lay the front panel RS up.
Position the leaf centers approximately:
- 2¼, 6⅛, and 10 inches from the left edge
- 2¼, 6, and 9¾ inches above the bottom edge
Point the tips upward and the stems downward. Alternate the colors so identical shades do not form a single column.
Pin all nine leaves before sewing. Attach each around its outer edge with small stitches, then add a few stitches along the center vein to prevent lifting.
Optional Cream Diamond Outlines
For a closer visual connection to the inspiration, frame each leaf with a fine cream chain.
Make one chain at a time, checking its length against a diamond approximately 3½ inches wide and 3½ inches tall. FO when it fits without stretching.
Sew the chain around a leaf using small matching stitches. Keep the leaf inside the diamond and avoid pulling the panel inward.
Repeat around the remaining leaves. If your leaves are too large to fit comfortably, omit the outlines.
Shoulder Handles
Make two in cream.
Row 1: Ch 8. Starting in the second ch from the hook, sc across. (7)
Rows 2–117: Ch 1, turn, sc across. (7)
FO.
At the stated gauge, each handle measures approximately 26 inches before attachment.
Join cream at one corner and sc around the handle, placing approximately 1 sc into each row end along the long edges and 1 sc into each stitch across the short ends. Work 3 sc at each corner, counting each corner once.
Sl st into the first sc and FO.
The edging should lie flat. Adjust the number of stitches along the row ends if it puckers or ripples.
Assemble the Tote
Pin one long edge of the gusset around the front panel’s sides and bottom. Match the corner markers and keep the outer surfaces facing out.
Whipstitch the edges together with cream yarn. Repeat with the back panel and the remaining gusset edge.
Join cream at a side seam.
Top Round 1: Ch 1, sc evenly around the opening, working into each stitch across the panels and evenly across the short gusset ends. Join with a sl st.
Top Round 2: Ch 1, sc around. Join and FO.
Position the handle ends approximately 2½ inches from the side seams. Overlap each end onto the outside of the bag by 2 inches.
Sew a rectangle around each overlap, then sew an X inside it. Keep both handles the same length.
2. Mini Four-Leaf Tote
This compact version uses four leaves and shorter handles. It is a manageable option when you want a smaller project.
Materials and Size
Allow approximately 250–350 yards of cream cotton and 60–90 yards total in your leaf colors.
Each panel measures approximately 8¼ × 8 inches at the main gauge.
Panels
Make two in cream.
Row 1: Ch 34. Starting in the second ch from the hook, sc across. (33)
Rows 2–36: Ch 1, turn, sc across. (33)
FO.
Gusset
Row 1: Ch 9. Starting in the second ch from the hook, sc across. (8)
Row 2: Ch 1, turn, sc across. (8)
Repeat Row 2 until the strip fits around the two sides and bottom of a panel, approximately 24¼ inches.
FO.
Leaves
Make four Pointed Leaf Appliqués from Idea #1.
Choose two olive leaves, one mustard leaf, and one rust leaf.
Arrange them in two rows of two, with centers approximately 2¼ and 6 inches from the left edge and 2¼ and 5¾ inches above the bottom.
Sew them down before assembling the bag.
Short Handles
Make two in cream.
Row 1: Ch 6. Starting in the second ch from the hook, sc across. (5)
Rows 2–63: Ch 1, turn, sc across. (5)
FO.
Assemble the tote and add the top edging following Idea #1. Attach each handle with a 1½-inch overlap, placing the ends approximately 1½ inches from the side seams.
3. Falling Leaves Diagonal Tote
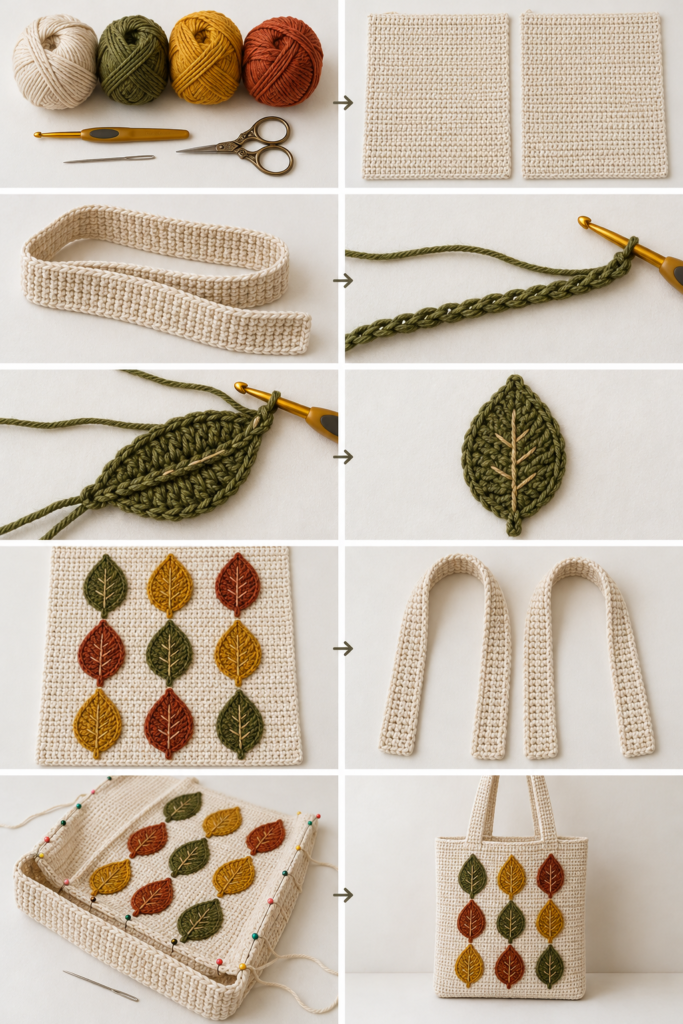
Five leaves arranged at different angles create the appearance of autumn foliage drifting across the bag.
Bag Base
Make the full-size panels, gusset, and handles from Idea #1 in oatmeal.
Omit the diamond outlines.
Leaves
Make five Pointed Leaf Appliqués from Idea #1:
- Two rust
- Two mustard
- One olive
Add matching or slightly darker embroidered veins.
Placement
With the front panel flat, position the leaf centers approximately:
- 2½ inches from the left and 2 inches above the bottom
- 4¼ inches from the left and 4 inches above the bottom
- 6⅛ inches from the left and 6 inches above the bottom
- 8 inches from the left and 8 inches above the bottom
- 9¾ inches from the left and 10 inches above the bottom
Rotate neighboring leaves slightly in opposite directions.
Check that the leaves remain inside the seam allowance and do not overlap heavily. Sew them down around their edges and along the center veins.
Contrasting Top Border
Assemble the tote following Idea #1.
Work Top Round 1 in oatmeal and Top Round 2 in rust. Attach the oatmeal handles as instructed in the classic version.
4. Autumn Pocket Tote
A rust-colored exterior pocket makes this version useful for items you want to reach quickly. Three leaves decorate the upper front.
Bag Base
Make the full-size panels, gusset, and handles from Idea #1 in cream.
Exterior Pocket
Use rust yarn.
Row 1: Ch 30. Starting in the second ch from the hook, sc across. (29)
Rows 2–25: Ch 1, turn, sc across. (29)
Change to cream.
Rows 26–27: Ch 1, turn, sc across. (29)
FO, leaving a long sewing tail.
The pocket measures approximately 7¼ inches wide × 6 inches tall.
Attach the Pocket
Center the pocket horizontally on the front panel. Position its lower edge approximately ¾ inch above the panel’s bottom.
Sew down both sides and across the bottom. Leave the upper edge open.
Reinforce both upper corners with several extra stitches.
Leaf Decoration
Make three leaves following Idea #1: one olive, one mustard, and one rust.
Place their centers approximately 2¼, 6⅛, and 10 inches from the left edge, and approximately 9¼ inches above the bottom.
Check that the stems remain above the pocket opening. Sew the leaves in place.
Assemble the tote and attach its handles following Idea #1.
5. Olive Vine Tote with Small Leaves
This variation uses a curved vine and six smaller leaves along one side of the bag. The open cream background gives the design a quieter look.
Bag Base
Follow the full-size body, gusset, and handle instructions from Idea #1.
Use cream for the main pieces and olive for the final top edging round.
Small Leaves
Make six in olive, mustard, or a mixture of both.
Foundation: Ch 8.
Round 1: Starting in the second ch from the hook, work 1 sc, 1 hdc, 1 dc in each of the next 3 ch, and 1 hdc.
In the last ch, work [sc, picot, sc].
Rotate to the unused side of the foundation chain. Work 1 hdc, 1 dc in each of the next 3 ch, 1 hdc, and 1 sc.
Sl st into the first sc. (14 stitches, plus the picot)
Stem: Ch 3. Starting in the second ch from the hook, sl st into each of the next 2 ch. Sl st into the leaf base.
FO, leaving a sewing tail.
Embroider a center vein with matching yarn.
Vine Cord
With olive, chain until the cord measures approximately 11 inches without stretching.
Starting in the second ch from the hook, sl st into each ch.
FO, leaving a long sewing tail.
Arrangement
Pin the vine in a gentle curve running from approximately 2 inches above the bottom-left area toward the upper center of the front panel.
Sew the cord down through each chain.
Arrange three leaves on each side of the vine, with their stems touching it. Angle the tips outward and upward. Space them evenly and sew them in place.
Assemble the bag following Idea #1.
6. Harvest Stripe Leaf Tote
A cream-and-mustard striped background adds color without changing the basic bag construction.
Striped Panels
Make two.
Row 1, cream: Ch 50. Starting in the second ch from the hook, sc across. (49)
Rows 2–9, cream: Ch 1, turn, sc across. (49)
Continue with 49 sc in each row:
- Rows 10–18: Mustard
- Rows 19–27: Cream
- Rows 28–36: Mustard
- Rows 37–45: Cream
- Rows 46–54: Mustard
Change colors on the final yarn-over of the last stitch before the new stripe.
FO and weave in the ends.
Gusset and Handles
Make the gusset and handles from Idea #1 in cream.
Leaves
Make three Pointed Leaf Appliqués from Idea #1: two rust and one olive.
Arrange them in a horizontal band with their centers approximately 2¼, 6⅛, and 10 inches from the left edge, and 6 inches above the bottom.
Keep the middle leaf upright and tilt the outer leaves slightly outward.
Sew them down before assembling the tote.
Finishing
Join the bag pieces following Idea #1. Work both top edging rounds in cream and attach the cream handles.
7. Drawstring Leaf Project Tote
A drawstring opening makes this version useful for carrying a small yarn project. Four leaves decorate the lower front without interfering with the closure.
Main Pieces
Make the full-size panels, gusset, and handles from Idea #1 in cream.
Make four Pointed Leaf Appliqués from Idea #1.
Arrange them in two rows of two on the lower front. Keep their upper tips at least 3 inches below the bag opening.
Sew down the leaves and assemble the body. Do not work the original top edging.
Drawstring Eyelets
Join olive at a side seam.
Round 1: Ch 1, sc evenly around the opening. Count the stitches before joining. If the total is odd, add one extra sc at the final insertion point to make an even count. Sl st into the first sc.
Round 2: Ch 1, repeat [sc in the next st, ch 1, skip the next st] around. Sl st into the first sc.
Round 3: Ch 1, work 1 sc in each sc and 1 sc in each ch-1 space around. Join.
Round 4: Ch 1, sc around. Join and FO.
Rounds 3 and 4 have the same stitch count as Round 1.
Drawstring Cords
Make two in olive.
Row 1: Chain until the cord measures approximately 42 inches without stretching.
Row 2: Starting in the second ch from the hook, sl st into each ch.
FO and secure the ends.
Weave the first cord through the eyelets around the entire opening, bringing both ends out at the left side.
Weave the second cord in the opposite direction, bringing its ends out at the right side.
Knot each cord’s two ends together. Pull on the paired ends to gather the opening.
Attach the Handles
Sew the handles onto the solid body below the eyelet border. Keep the attachment stitches clear of the drawstring channel.
How to Assemble a Crochet Leaf Tote Bag Neatly
Attach decorations while the front panel is flat. This makes it easier to hide sewing stitches and avoid accidentally stitching through the back of the bag.
Before joining the body:
- Block both panels to matching measurements.
- Check the gusset against the actual panel edges.
- Pin the bottom corners first.
- Distribute the remaining gusset evenly along the sides.
- Sew without stretching either piece.
- Check that both handles have equal free length before attaching them.
Use the leaf sewing tails to secure the outer edges. Add a few central anchoring stitches so the appliqués stay close to the bag during use.
Optional Lining
For a lining, measure the completed bag’s interior.
Cut two fabric panels to the interior width and height, adding ½-inch seam allowances along the sides and bottom and 1 inch at the top.
Cut a gusset strip to the interior depth plus two ½-inch seam allowances. Measure its length around the lining panel’s sides and bottom, allowing extra fabric at both upper ends.
Sew the lining gusset to the two panels. Insert the lining with its seam allowances facing the crochet fabric.
Turn the upper edge under twice and hand-stitch it beneath the opening. On the drawstring version, keep the lining below the eyelets.
Best Yarn for a Crochet Leaf Tote Bag
Smooth cotton yarn gives the body clear stitch definition and helps the leaf details remain visible.
Choose a yarn that produces a firm but flexible single crochet fabric. If your swatch feels loose or shows large gaps, try a smaller hook and recheck the finished measurements.
A cotton blend can also work, but make a swatch first to assess stretch. Bag handles often benefit from woven cotton tape sewn along their undersides.
Use the same yarn weight for all three leaf colors so the motifs are similar in size.
Best Fall Color Combinations
- Cream, olive, mustard, and rust: Closest to the autumn inspiration.
- Oatmeal, burgundy, and antique gold: Rich colors with a warm neutral background.
- Camel, chocolate, and burnt orange: An earthy combination.
- Ivory and sage: A subtle leaf design for everyday use.
- Charcoal, copper, and ochre: Stronger contrast with a darker base.
- Cream, dusty rose, and taupe: A softer interpretation of fall color.
Lay the yarns together before starting. The leaves should stand out clearly against the bag body.
Beginner Crochet Tips
Practice Working Around a Chain
The leaf begins on one side of a foundation chain and returns along the other. Mark the final foundation chain so you can identify the turning point easily.
Check One Leaf Before Making Nine
A sample lets you check its size against the bag. Adjust the leaf hook size before committing to the full set.
Keep Embroidery Relaxed
Pulling the center vein too tightly can fold or pucker the leaf. Lay the motif flat after every few embroidery stitches.
Count the Panel Edges
Use markers in the first and last stitches of each row. This helps keep the rectangles straight.
Pin the Entire Arrangement
Place all the leaves before sewing any of them down. You can adjust color balance and spacing much more easily at this stage.
Reinforce Handle Attachments
Use a rectangle-and-X sewing pattern through each overlapped handle end. Secure the yarn tails through several stitches on the inside.
Frequently Asked Questions
Is a crochet leaf tote bag beginner-friendly?
The body is suitable for beginners who can work consistent single crochet rows. The leaves introduce half double crochet, double crochet, and working around a chain, so practicing one leaf first is helpful.
Are the leaves crocheted directly into the bag?
No. These designs use separate leaf appliqués sewn onto solid crochet panels. This lets you adjust the colors and arrangement before attaching them.
Can I use leftover yarn for the leaves?
Yes, provided the yarns are similar in thickness and have compatible care instructions. Check each color’s sample leaf because different yarns can produce different sizes.
Can I decorate both sides?
Yes. Make a second set of leaves and sew them onto the back panel before assembling the bag. Allow additional yarn for the extra motifs.
How do I reduce stretching?
Use a firm fabric, reinforce the handle attachments, and consider a fabric lining. Woven tape on the undersides of the handles can also help limit their stretch.
How should I wash the finished tote?
Follow the yarn and lining care instructions. Reshape the damp bag and leaves, then dry the tote flat. Avoid hanging a wet bag by its handles.
Final Thoughts
A crochet leaf tote bag is a satisfying way to bring autumn color into a practical handmade project. The classic cream version celebrates olive, mustard, and rust, while the smaller, striped, pocket, and vine variations offer different ways to use the same basic skills.
Start with a gauge swatch and one leaf, arrange the decorations before sewing, and take time to reinforce the handles. Those small steps help create a neat tote you can enjoy throughout the season.