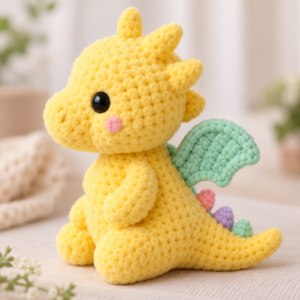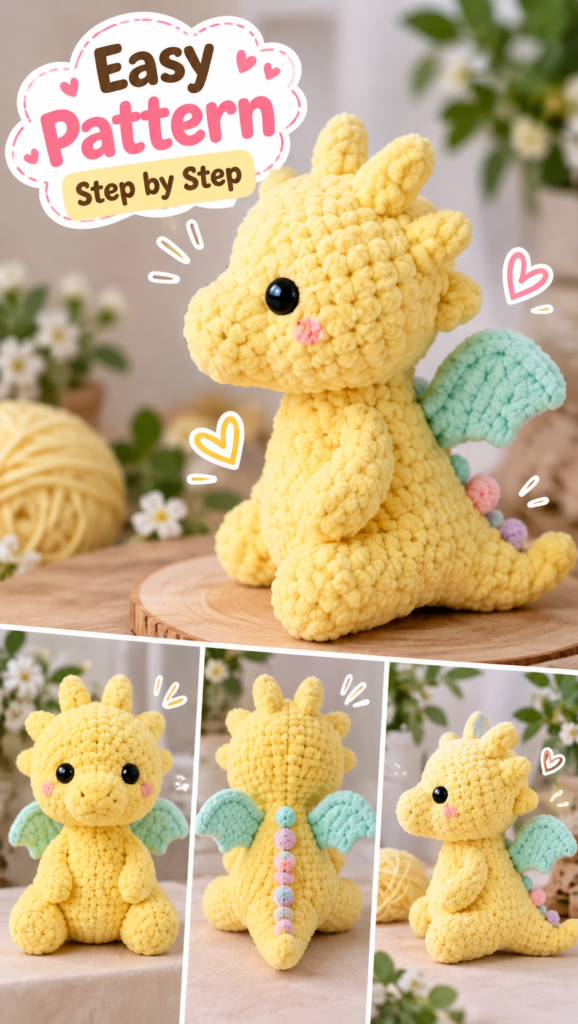
Looking for an adorable crochet project that combines fantasy, creativity, and cuteness? This easy crochet baby dragon amigurumi pattern is the perfect project for anyone who loves handmade plush toys.
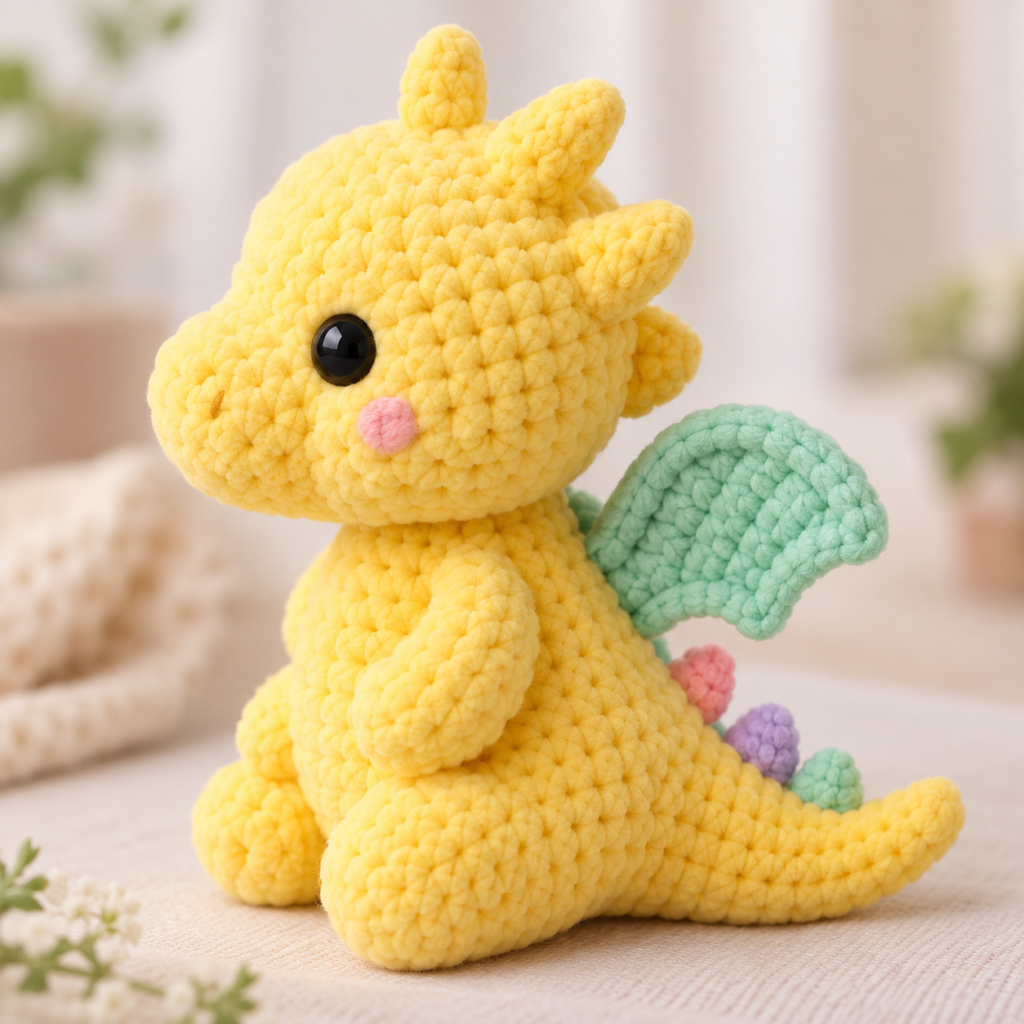
With its soft yellow body, tiny mint green wings, adorable little horns, rosy cheeks, and colorful tail spikes, this baby dragon is full of personality.
The dragon sits in a sweet, relaxed position, making it a lovely handmade decoration, collectible plushie, or thoughtful gift.
In this step-by-step tutorial, you’ll learn how to crochet the dragon’s head, body, arms, legs, wings, horns, and tail before assembling everything into one adorable amigurumi creation.
Whether you’re a beginner looking for a fun challenge or an experienced crocheter searching for a cute new project, this little dragon is sure to become a favorite.
Why You’ll Love This Crochet Baby Dragon Pattern
There are so many reasons to make this adorable crochet dragon!
- Adorable design: A chubby yellow dragon with tiny wings and colorful details.
- Beginner-friendly construction: Uses basic crochet stitches and simple shaping techniques.
- Soft plush texture: Perfect for making with fluffy chenille yarn.
- Customizable colors: Try pastel pink, lavender, mint green, or baby blue.
- Fun handmade gift: Great for birthdays, baby showers, and fantasy lovers.
- Perfect for amigurumi collections: A cute addition to your handmade crochet animals.
Materials You’ll Need
Before starting your crochet baby dragon, gather the following supplies.
Yarn Colors
- Soft yellow chenille yarn for the head, body, arms, legs, horns, and tail
- Mint green yarn for the wings
- Pastel pink yarn for the cheeks and tail spikes
- Lavender or cream yarn for additional tail details
Crochet Supplies
- 3.5–4.5 mm crochet hook, depending on your yarn
- 8–10 mm black safety eyes
- Polyester fiberfill stuffing
- Yarn needle
- Stitch markers
- Scissors
- Optional: Pink embroidery thread for cheeks
Skill Level: Confident Beginner
Estimated Time: 5–7 hours
Finished Size: Approximately 7–9 inches tall, depending on yarn weight, hook size, and tension.
Crochet Abbreviations (US Terms)
- MR: Magic Ring
- CH: Chain
- SC: Single Crochet
- HDC: Half Double Crochet
- DC: Double Crochet
- SL ST: Slip Stitch
- INC: Increase (2 SC in one stitch)
- DEC: Invisible Decrease
- FO: Fasten Off
- ST: Stitch
- BLO: Back Loop Only
All instructions use US crochet terminology.
Unless otherwise stated, work in continuous rounds using a stitch marker to mark the beginning of each round.
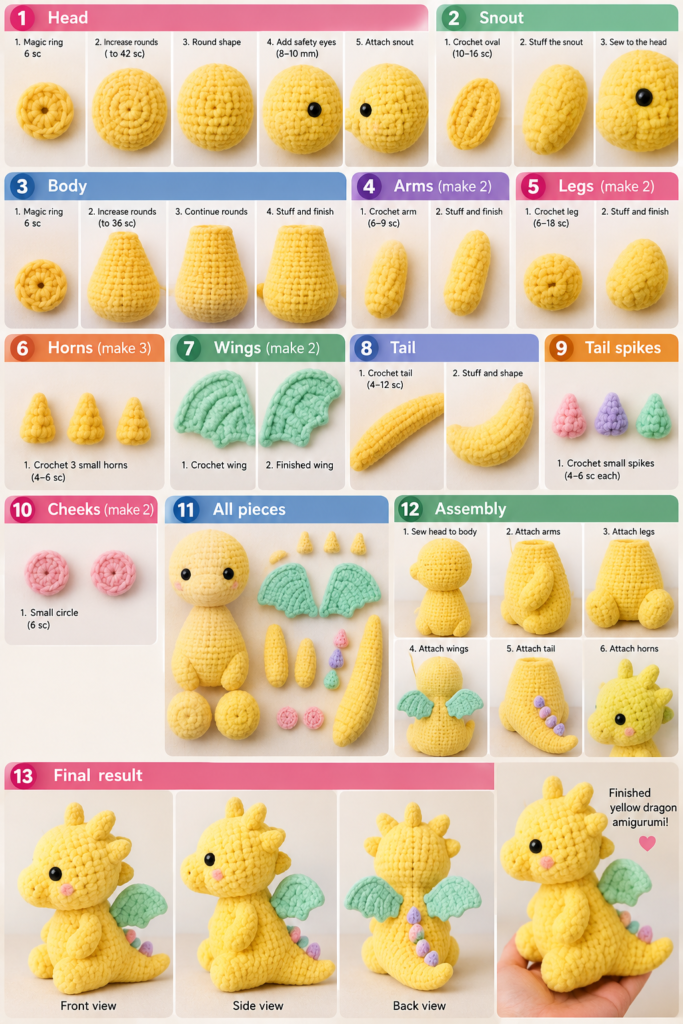
Step 1: Crochet the Baby Dragon’s Head
The dragon’s large, rounded head is one of its cutest features.
We’ll begin with yellow chenille yarn.
Head Pattern
Using yellow yarn:
- Round 1: 6 SC in MR. (6)
- Round 2: INC around. (12)
- Round 3: (1 SC, INC) × 6. (18)
- Round 4: (2 SC, INC) × 6. (24)
- Round 5: (3 SC, INC) × 6. (30)
- Round 6: (4 SC, INC) × 6. (36)
- Round 7: (5 SC, INC) × 6. (42)
- Rounds 8–13: SC around. (42)
- Round 14: (5 SC, DEC) × 6. (36)
- Round 15: (4 SC, DEC) × 6. (30)
- Round 16: (3 SC, DEC) × 6. (24)
- Round 17: (2 SC, DEC) × 6. (18)
- Round 18: (1 SC, DEC) × 6. (12)
- Round 19: DEC around. (6)
Add the Eyes
Before closing the head completely, position the safety eyes between Rounds 10 and 11, approximately 8 stitches apart.
Insert the eyes and secure them firmly.
Stuff the head with polyester fiberfill, keeping it soft but rounded.
Close the remaining opening using a yarn needle.
Tip: For a dragon intended for a young child, use securely embroidered eyes instead of plastic safety eyes.
Step 2: Crochet the Dragon’s Snout
The dragon has a cute, slightly elongated snout that gives its face a gentle expression.
Using yellow yarn:
- Round 1: CH 5.
- Round 2: Starting in the second chain, work 3 SC, 3 SC in the last chain, continue along the opposite side with 2 SC, then INC in the final chain. (10)
- Round 3: INC, 2 SC, 3 INC, 2 SC, 2 INC. (16)
- Rounds 4–5: SC around. (16)
Fasten off, leaving a long tail for sewing.
Lightly stuff the snout.
Position it on the lower front of the head, slightly below the eyes.
Sew it securely into place.
For extra detail, embroider two tiny nostrils using matching yellow or light brown yarn.
Step 3: Crochet the Dragon’s Body
The dragon’s body is rounded and slightly wider at the bottom, allowing it to sit comfortably.
Using yellow yarn:
- Round 1: 6 SC in MR. (6)
- Round 2: INC around. (12)
- Round 3: (1 SC, INC) × 6. (18)
- Round 4: (2 SC, INC) × 6. (24)
- Round 5: (3 SC, INC) × 6. (30)
- Round 6: (4 SC, INC) × 6. (36)
- Rounds 7–11: SC around. (36)
- Round 12: (4 SC, DEC) × 6. (30)
- Round 13: SC around. (30)
- Round 14: (3 SC, DEC) × 6. (24)
- Round 15: SC around. (24)
- Round 16: (2 SC, DEC) × 6. (18)
- Round 17: SC around. (18)
Fasten off, leaving a long tail for sewing.
Stuff the body firmly enough to maintain its shape.
The wider base helps create the dragon’s adorable sitting posture.
Step 4: Crochet the Dragon’s Arms (Make 2)
The dragon has two small, rounded arms resting along the front of its body.
Using yellow yarn:
- Round 1: 6 SC in MR. (6)
- Round 2: (1 SC, INC) × 3. (9)
- Rounds 3–7: SC around. (9)
- Round 8: (1 SC, DEC) × 3. (6)
Lightly stuff the lower half of each arm.
Flatten the opening and close it with 3 SC through both layers.
Fasten off, leaving a long tail for sewing.
Repeat to make the second arm.
Step 5: Crochet the Dragon’s Legs (Make 2)
The baby dragon has two small, rounded legs that help it sit upright.
Using yellow yarn:
- Round 1: 6 SC in MR. (6)
- Round 2: INC around. (12)
- Round 3: (1 SC, INC) × 6. (18)
- Rounds 4–5: SC around. (18)
- Round 6: (1 SC, DEC) × 6. (12)
- Rounds 7–8: SC around. (12)
Stuff lightly.
Fasten off, leaving a long tail for sewing.
Repeat for the second leg.
Attach the legs to the lower front of the body, positioning them slightly outward.
This creates a cute seated appearance.
Step 6: Crochet the Dragon’s Horns (Make 3)
The dragon’s tiny yellow horns give it a playful fantasy appearance.
You can make three horns of slightly different lengths.
Using yellow yarn:
- Round 1: 4 SC in MR. (4)
- Round 2: (1 SC, INC) × 2. (6)
- Rounds 3–5: SC around. (6)
Fasten off, leaving a long tail for sewing.
For shorter horns, stop after Round 4.
Make three horns and position them along the top of the dragon’s head.
Sew each horn securely into place.
Step 7: Crochet the Mint Green Dragon Wings (Make 2)
The small mint green wings are one of the most charming details of this crochet baby dragon.
They add a soft pop of color against the yellow body.
Wing Pattern
Using mint green yarn:
- Row 1: CH 3, work 2 SC starting in the second chain. (2)
- Row 2: CH 1, turn, INC, SC. (3)
- Row 3: CH 1, turn, SC, INC, SC. (4)
- Row 4: CH 1, turn, SC, INC, 2 SC. (5)
- Row 5: CH 1, turn, 2 SC, INC, 2 SC. (6)
- Row 6: CH 1, turn, SC across. (6)
- Row 7: CH 1, turn, DEC, 4 SC. (5)
- Row 8: CH 1, turn, DEC, 3 SC. (4)
Fasten off, leaving a long tail for sewing.
Shape the Wings
Gently stretch and shape each wing to create a soft triangular appearance.
For a more decorative finish, work a row of SC around the outer edge.
Repeat to make the second wing.
Attach the Wings
Position the wings on the upper back of the dragon’s body.
Angle them slightly outward so they remain visible from the front and side.
Sew them securely into place.
Step 8: Crochet the Dragon’s Tail
The dragon’s long, gently curved tail adds balance and personality to the finished amigurumi.
Using yellow yarn:
- Round 1: 4 SC in MR. (4)
- Round 2: SC around. (4)
- Round 3: (1 SC, INC) × 2. (6)
- Rounds 4–5: SC around. (6)
- Round 6: (2 SC, INC) × 2. (8)
- Rounds 7–8: SC around. (8)
- Round 9: (3 SC, INC) × 2. (10)
- Rounds 10–11: SC around. (10)
- Round 12: (4 SC, INC) × 2. (12)
- Rounds 13–15: SC around. (12)
Lightly stuff the tail.
Fasten off, leaving a long tail for sewing.
Shape the Tail
Gently curve the tail toward one side.
Attach the wider end to the lower back of the dragon.
Position the tail so it extends along the floor beside the body.
Step 9: Crochet the Colorful Tail Spikes
The dragon’s tail features adorable little pastel spikes.
You can use pink, mint green, lavender, or cream yarn.
Small Spike Pattern
- Round 1: 4 SC in MR. (4)
- Round 2: (1 SC, INC) × 2. (6)
- Round 3: SC around. (6)
Fasten off, leaving a long tail for sewing.
Make approximately 4–5 spikes in different pastel colors.
Attach the Spikes
Position the spikes along the top of the dragon’s tail.
Start with the smallest spike near the tip.
Gradually increase the size toward the base of the tail.
Sew each spike securely into place.
Step 10: Add the Dragon’s Pink Cheeks
The dragon’s soft pink cheeks create an adorable, friendly expression.
You can embroider the cheeks or crochet two small pink circles.
Easy Crochet Cheeks
Using pastel pink yarn:
- Round 1: 6 SC in MR. (6)
SL ST to close.
Fasten off, leaving a tail for sewing.
Make two small circles.
Attach them just below the eyes, on either side of the snout.
For a softer appearance, use pink embroidery thread to create small blush marks instead.
Step 11: Assemble Your Crochet Baby Dragon
Now that all the pieces are complete, it’s time to bring your adorable dragon to life!
1. Attach the Head
Position the head on top of the body.
Make sure the snout faces forward.
Use the long yarn tail to sew the head securely to the body.
2. Attach the Arms
Position the arms on either side of the upper body.
Angle them slightly toward the front.
3. Attach the Legs
Sew the legs to the lower front of the body.
Make sure the dragon can sit comfortably.
4. Attach the Wings
Position the mint green wings on the upper back.
Angle them outward slightly.
5. Attach the Tail
Sew the tail to the lower back.
Curve it gently toward one side.
6. Add the Horns and Spikes
Attach the yellow horns along the top of the head.
Sew the pastel spikes along the tail.
7. Finish the Face
Add the pink cheeks and adjust the snout.
Check that all pieces are securely attached.
Your adorable yellow crochet baby dragon is complete!
Helpful Tips for Beginners
Use Soft Chenille Yarn
Chenille yarn creates a fluffy, plush texture that works beautifully for cute amigurumi animals.
Keep Your Stitches Tight
Consistent tension helps prevent stuffing from showing through the stitches.
Use Stitch Markers
Stitch markers make it easier to keep track of rounds, especially when working with fluffy yarn.
Stuff Gradually
Add small amounts of stuffing as you crochet to help maintain the shape of each piece.
Pin Before Sewing
Use sewing pins to position the arms, legs, wings, and tail before attaching them permanently.
This helps you create a balanced finished dragon.
5 Cute Crochet Baby Dragon Color Ideas
Want to make more than one baby dragon? Try these adorable color combinations!
1. Pastel Pink Dragon
Use soft pink yarn for the body and cream yarn for the wings.
2. Lavender Baby Dragon
Create a magical purple dragon with mint green wings.
3. Mint Green Dragon
Use mint green yarn for the body and pastel yellow for the horns.
4. Baby Blue Dragon
Combine soft blue yarn with white wings and lavender spikes.
5. Rainbow Baby Dragon
Use cream yarn for the body and colorful pastel yarn for the horns and tail spikes.
Creative Ways to Use Your Crochet Baby Dragon
This adorable amigurumi dragon can be used in many different ways.
Handmade Birthday Gift
Surprise a friend or family member with a personalized crochet dragon in their favorite colors.
Nursery Room Decoration
Display the dragon on a shelf or in a decorative basket.
Fantasy-Themed Decor
Add the dragon to a collection of magical creatures, unicorns, and other fantasy-inspired crochet toys.
Handmade Craft Collection
Create several dragons in different colors to build a cute amigurumi collection.
Crochet Photography
Use your finished dragon in cozy craft photography or handmade project displays.
Frequently Asked Questions
Is this crochet baby dragon pattern suitable for beginners?
Yes! This pattern uses basic crochet stitches such as single crochet, increases, and decreases. Beginners who understand working in rounds should be able to follow the instructions.
What is the best yarn for crochet dragons?
Chenille yarn is a great option for making soft plush dragons. Cotton and acrylic yarn can also be used for smaller, more detailed amigurumi.
How long does it take to crochet a baby dragon?
Depending on your experience, this project may take approximately 5–7 hours.
Can I make this dragon without safety eyes?
Absolutely! You can embroider the eyes using black yarn or embroidery thread.
How do I make the dragon sit upright?
Use a wider body base, position the legs toward the front, and attach the tail to provide additional balance.
Can I make a larger crochet dragon?
Yes! Use thicker yarn and a larger crochet hook to create a bigger plush dragon. The final size will depend on your materials and tension.
Final Thoughts
Creating your own easy crochet baby dragon amigurumi is a fun and rewarding project that combines adorable design with simple crochet techniques.
With its fluffy yellow body, tiny mint green wings, cute horns, rosy cheeks, and colorful tail spikes, this little dragon is full of handmade charm.
Whether you’re making it as a thoughtful gift, adding it to your amigurumi collection, or simply enjoying a relaxing crochet project, this baby dragon is sure to bring a smile.
Grab your favorite yarn, pick up your crochet hook, and start creating your own adorable crochet dragon today!
Love this crochet baby dragon pattern? Save this tutorial to Pinterest so you can easily find it again and share it with your crochet-loving friends!