
1. Introduction
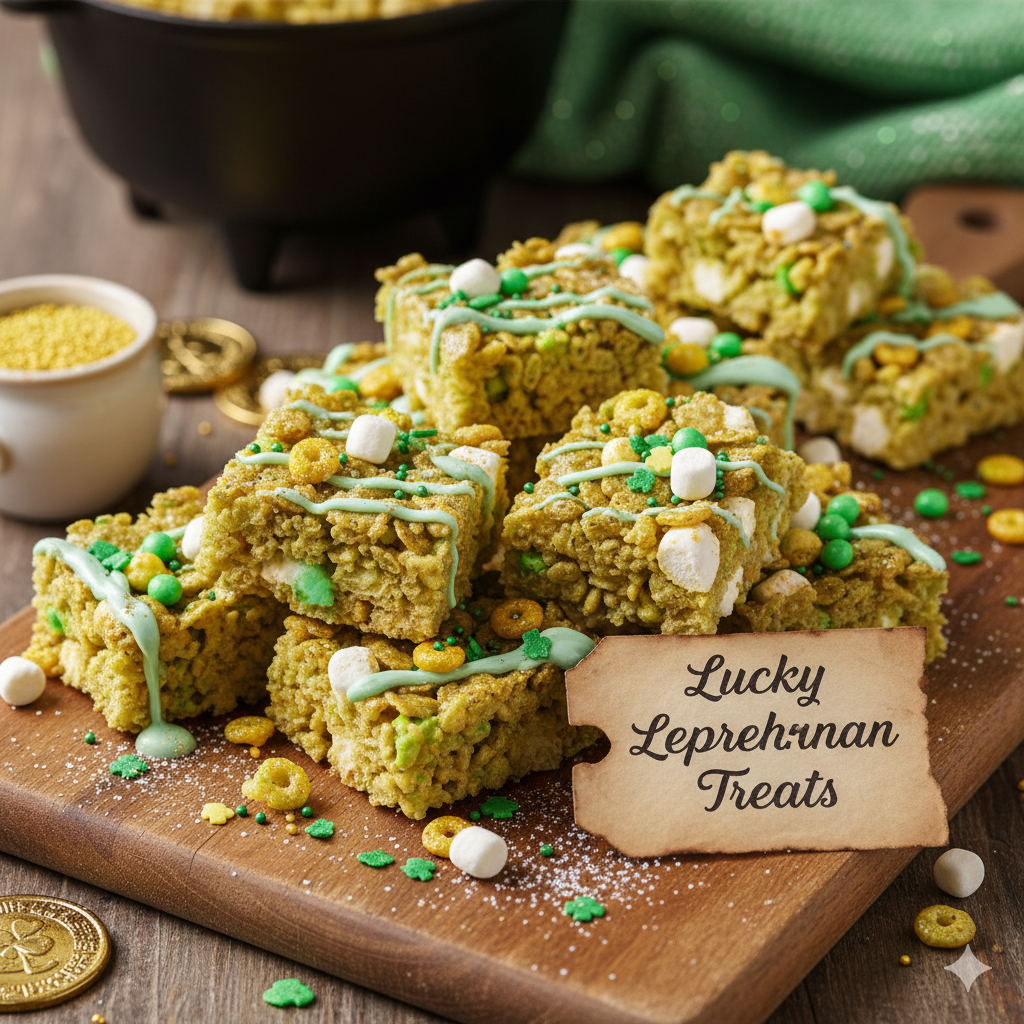
When the mist settles over the rolling green hills and the first whispers of March arrive, thoughts naturally turn to folklore, luck, and—most importantly—gold at the end of the rainbow. Lucky Leprechaun Treats are more than just a snack; they are a whimsical tribute to the spirit of St. Patrick’s Day.
These treats are a vibrant, “glowed-up” version of the classic marshmallow cereal bar. By blending crunchy, toasted oat cereal with an abundance of colorful marshmallow “charms,” we create a texture that is simultaneously crispy and chewy. The addition of white chocolate drizzle and festive sprinkles transforms a simple childhood favorite into a gourmet holiday centerpiece.
The significance of this recipe lies in its ability to bring a touch of “magic” to the kitchen. Whether you’re preparing these for a school bake sale, a festive office gathering, or a cozy family night, they evoke a sense of playfulness. Legend has it that if you leave a piece out on the eve of March 17th, you might just catch a leprechaun—though, in our experience, these disappear so quickly that the “leprechauns” are usually just hungry family members!
2. Recipe Overview
- Cuisine Type: American / Holiday Dessert
- Difficulty Level: Easy (Kid-friendly)
- Total Time: 45 minutes (15 mins prep, 30 mins setting)
- Dietary Classifications: Vegetarian, Nut-Free (check labels), Gluten-Free (if using certified GF cereal)
3. Equipment and Tools
To ensure your treats come out perfectly square and structurally sound, use the following tools:
- Mixing Bowl: A very large, heat-safe glass or stainless steel bowl (at least 5-quart capacity).
- Large Stockpot: For melting butter and marshmallows without scorching.
- Baking Pan: A 9×13-inch (23×33 cm) rectangular metal or glass pan.
- Depth Requirement: Minimum of 2 inches deep to allow for thick, substantial bars.
- Silicone Spatula: High-heat resistant; essential for handling sticky marshmallow fluff.
- Parchment Paper: To prevent sticking and allow for easy removal from the pan.
- Kitchen Scale: Recommended for precise cereal and marshmallow ratios.
4. Serving Suggestions
Plating Recommendations
Serve these on a rustic wooden platter or a bright green ceramic dish. To lean into the theme, scatter a few gold-wrapped chocolate coins around the base of the treats.
Garnish Ideas
- A dusting of edible gold luster beads.
- Extra “charms” pressed into the top while the white chocolate is still wet.
- A sprinkle of flaky sea salt to balance the intense sweetness.
Pairings
- Beverage: A cold glass of milk (dye it green with a drop of food coloring for extra fun!).
- Coffee: A rich Irish cream flavored coffee (non-alcoholic) or a classic flat white.
- Tea: A bold Irish Breakfast tea to cut through the sugar.
5. Nutritional Information (Per Serving)
Serving Size: 1 Bar (Based on 16 servings per pan)
| Nutrient | Amount |
| Calories | 245 kcal |
| Total Fat | 8g |
| Saturated Fat | 5g |
| Cholesterol | 15mg |
| Sodium | 180mg |
| Total Carbohydrates | 42g |
| Dietary Fiber | 1g |
| Sugars | 22g |
| Protein | 2g |
Health Note: While these are a festive indulgence, the oat-based cereal provides a small amount of whole grain. For a lower-sugar version, use a higher ratio of plain toasted oats to marshmallow charms.
6. Storage and Reheating
Proper Storage
Store treats in an airtight container at room temperature. Place a sheet of parchment paper between layers to prevent them from fusing together.
- Refrigeration: Not recommended. Cold air makes the marshmallows turn hard and “stale” in texture.
- Freezing: You can freeze these for up to 6 weeks. Wrap individual bars tightly in plastic wrap and place them in a freezer bag. Thaw at room temperature for 30 minutes before eating.
- Reheating: If they have become a bit too firm, microwave a single bar for 5–8 seconds just to soften the marshmallow bonds.
7. Expert Tips and Variations
Professional Chef Tips
- Don’t Overcook: When melting marshmallows, remove them from the heat the moment they are 90% melted. The residual heat will finish the job. Overheating marshmallows results in a rock-hard treat.
- The “Light Touch”: When pressing the mixture into the pan, do not pack it down firmly. Use a buttered spatula to gently pat it into the corners. Packing it tightly makes the bars dense and difficult to bite.
- Salt is Key: Always use salted butter or add a pinch of kosher salt. It amplifies the cereal flavor and tames the sugar.
Creative Variations
- The “Pot of Gold”: Dip the bottom of each finished bar in melted dark chocolate.
- Minty Magic: Add 1/4 teaspoon of peppermint extract to the melted marshmallow mixture and use green food coloring for a “Shamrock Shake” flavor profile.
- Protein Boost: Stir in a half-cup of almond butter or peanut butter into the marshmallow melt for a nuttier, more filling snack.
8. Ingredients Section
The Foundation
- 6 cups (approx. 300g) Lucky Charms™ or similar toasted oat cereal with marshmallows.
- 10 oz (283g) Fresh Mini Marshmallows (plus an extra 1 cup for “mix-ins”).
- 6 tbsp (85g) High-quality Salted Grass-fed Butter (e.g., Kerrygold).
- 1 tsp Pure Vanilla Extract.
The Topping
- 1/2 cup White Chocolate Melts or High-quality White Chocolate Chips.
- 2 tbsp Festive St. Patrick’s Day Sprinkles (shamrocks, green sanding sugar).
Substitutions
- Vegan Option: Use coconut oil or vegan butter and gelatin-free marshmallows (like Dandies).
- Dairy-Free: Substitute white chocolate with a dairy-free alternative or skip the drizzle entirely.
9. Step-by-Step Instructions
- Prepare the Pan: Line your 9×13-inch pan with parchment paper, leaving an overhang on the sides for easy lifting. Lightly grease the paper with butter or non-stick spray.
- Melt the Butter: In a large stockpot over low heat, melt the 6 tablespoons of butter. Ensure it doesn’t brown; you want a gentle melt.
- Add Marshmallows: Add the 10 oz bag of mini marshmallows. Stir constantly with a silicone spatula.
- Incorporate Aromatics: Once the marshmallows are smooth and creamy, remove from heat. Stir in the vanilla extract and a pinch of salt if desired.
- Fold in Cereal: Quickly pour in the 6 cups of cereal. Use a folding motion to coat every piece of cereal with the marshmallow “glue.”
- Add Texture: Fold in that extra 1 cup of mini marshmallows you set aside. This creates “pockets” of un-melted marshmallow throughout the bars.
- Transfer to Pan: Gently transfer the mixture into the prepared pan. Using a buttered spatula (or buttered fingers), lightly pat the mixture to even it out.
- Decorate: Melt the white chocolate in the microwave in 20-second bursts. Drizzle over the top of the bars in a zigzag pattern. Immediately top with festive sprinkles.
- Set and Slice: Let the treats sit at room temperature for at least 30 minutes. Lift the parchment paper “sling” out of the pan and cut into 16 even squares using a sharp, greased knife.
10. Frequently Asked Questions (FAQ)
Q: Why are my treats too hard?
A: This usually happens if the marshmallows were melted over too high a heat or if the cereal was packed too tightly into the pan. Low and slow is the secret!
Q: Can I use large marshmallows instead of mini ones?
A: Yes, but they take longer to melt. Cut them into smaller pieces first to ensure even melting and prevent the butter from separating.
Q: How do I get clean edges when cutting?
A: Wipe your knife clean after every slice and lightly coat it with a flavorless oil or butter.
Q: Can I make these ahead of time?
A: Absolutely. They are best within 24–48 hours, but they stay fresh for up to 4 days if kept in a truly airtight container.
Q: Is there a way to make them less sweet?
A: You can swap 2 cups of the sweetened cereal for plain toasted “O” cereal. This maintains the crunch while lowering the sugar impact.