1. Introduction: The Soul of a Simple Egg
There is a long-standing culinary proverb that the true test of a chef’s skill isn’t a complex soufflé or a delicate reduction, but a simple omelet. To the uninitiated, it is merely “scrambled eggs with a fold,” but to the gourmand, it is a symphony of texture and timing.
The omelet—specifically the French Omelet—traces its lineage back to the late 18th century, though humans have been folding eggs over fillings since ancient Persia. It represents the pinnacle of “fast food” in its most literal sense: a dish that takes less than three minutes to cook but a lifetime to master. Whether it’s the rustic, browned “Country Style” (Omelette Grand-Mère) or the smooth, pale, almond-shaped “Classic French,” the omelet is a canvas for personal expression.
In this guide, we are stripping away the intimidation. We’ll explore the science of protein coagulation, the importance of thermal conductivity in your pans, and the sensory cues—the hiss of the butter, the sheen of the surface—that signal the transition from raw egg to culinary gold.
2. Recipe Overview
- Cuisine Type: French / International Breakfast
- Difficulty Level: Intermediate (Requires practice for the “fold”)
- Prep Time: 5 minutes
- Cook Time: 2–3 minutes
- Dietary Classifications: Vegetarian, Gluten-Free, Keto-friendly.
3. Equipment and Tools: Your Culinary Toolkit
To achieve that signature silkiness, your equipment must be as refined as your technique.
- The Pan: An 8-inch (20 cm) Non-Stick Skillet. This is the gold standard. The sloped sides (the flare) allow the omelet to slide up and roll over itself easily.
- The Spatula: A Heat-Resistant Silicone Spatula. Unlike metal, silicone won’t scratch your non-stick coating and provides the flexibility needed to “sweep” the curds.
- Mixing Vessel: A medium glass or stainless steel bowl.
- Whisk: A fine-wire balloon whisk or a heavy-duty dinner fork.
- Specifics: * Pan Depth: 1.5 to 2 inches.
- Bottom Diameter: 6 inches (for an 8-inch top rim).
4. Serving Suggestions: Elevating the Plate
An omelet is a centerpiece. Treat it with the respect of a main course.
- Plating: Serve on a pre-warmed ceramic plate. A cold plate will shock the eggs and cause them to weep moisture.
- Garnish: A precise “baton” of fresh chives or a delicate sprig of chervil.
- Side Dishes: A simple arugula salad with a lemon vinaigrette cuts through the richness of the butter. For a classic brunch, serve with a thick slice of buttered sourdough or pommes rissolées (cubed fried potatoes).
- Beverage Pairing: * Coffee: A crisp, light-roast pour-over.
- Wine: A dry Champagne or a crisp Chablis. The acidity cleanses the palate of the fatty egg yolk.

5. Nutritional Information (Per Serving)
- Calories: 280 kcal
- Protein: 14g
- Total Fat: 22g
- Carbohydrates: 2g
- Fiber: 0g
- Health Benefits: Eggs are a “complete protein,” containing all nine essential amino acids. They are also rich in Choline (brain health) and Lutein (eye health).
6. Storage and Reheating
Note: Omelets are best enjoyed within seconds of leaving the pan. However, if you must store them:
- Refrigeration: Store in an airtight container for up to 2 days.
- Freezing: Not recommended. The egg structure becomes rubbery and porous upon thawing.
- Reheating: Avoid the microwave if possible. Instead, place the omelet in a pan over low heat with a teaspoon of water and cover with a lid to “steam” it back to temperature.
7. Expert Tips and Variations
Professional Chef Tips
- The “Cold Butter” Trick: Whisk a few small bits of very cold butter into the raw eggs. As the eggs cook, the butter melts and creates tiny pockets of steam, resulting in a fluffier texture.
- Sieve for Success: For a perfectly smooth French omelet, pour your beaten eggs through a fine-mesh sieve to remove the chalazae (the white stringy bits).
Creative Variations
- The Mediterranean: Feta cheese, sundried tomatoes, and fresh oregano.
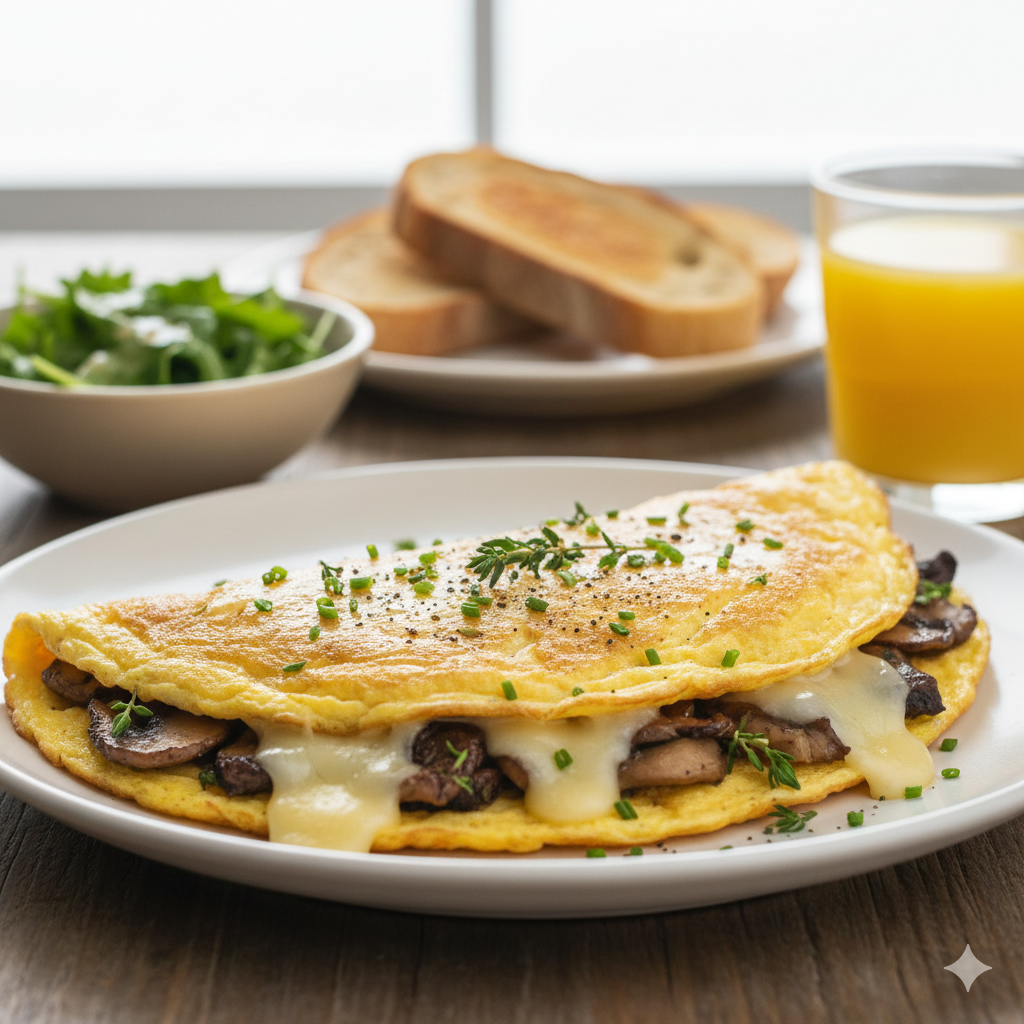
- The Forestier: Sautéed wild mushrooms (chanterelles or cremini) with thyme and Gruyère.
- The Truffle: A drop of white truffle oil and shaved Parmesan.
8. Ingredients Section
| Ingredient | Metric | Imperial | Note |
| Large Eggs | 3 units | 3 units | Room temperature is ideal. |
| Unsalted Butter | 15g | 1 tbsp | High-quality European style preferred. |
| Kosher Salt | 1g | 1/4 tsp | Add just before cooking. |
| White Pepper | Pinch | Pinch | Maintains the yellow aesthetic. |
| Fresh Chives | 5g | 1 tsp | Finely minced. |
| Gruyère Cheese | 30g | 2 tbsp | Finely grated (optional filling). |
9. Step-by-Step Instructions
Step 1: The Preparation
Crack the eggs into a bowl. Whisk vigorously until no streaks of white remain. The goal is a uniform, aerodynamic liquid. Season with salt and white pepper immediately before the eggs hit the pan; salting too early can break down the proteins prematurely.
Step 2: Heating the Pan
Place your 8-inch non-stick pan over medium-high heat. Add the butter. Watch closely. The butter will melt, then foam. When the foam subsides and just starts to turn fragrant (but not brown), the pan is ready.
Step 3: The Agitation (The “Scramble”)
Pour the eggs into the center of the pan. They should hiss slightly. Immediately begin moving the pan back and forth with your non-dominant hand while using the spatula to stir the eggs in a circular motion.
Visual Cue: You are looking for “small curd” scrambled eggs. Keep the eggs moving so no part stays in contact with the heat for too long.
Step 4: The Set
When the eggs are about 70% cooked—resembling wet, custardy curds—stop stirring. Use the spatula to smooth the eggs into an even layer across the bottom of the pan. Let it sit for 10–15 seconds to create a very thin “skin” on the bottom.
Step 5: The Filling
If using cheese or herbs, sprinkle them in a line across the center, perpendicular to the pan’s handle.
Step 6: The Fold and Slide
Tilt the pan away from you. Use your spatula to fold the edge nearest the handle over the center. Now, the “pro” move: tap the handle of the pan with your fist to jar the omelet toward the far edge of the pan, allowing it to begin curling over itself.
Step 7: The Final Roll
Slide the omelet onto a plate, using the edge of the pan to guide the final fold so the seam ends up on the bottom. The result should be a smooth, cigar-shaped cylinder with a moist, creamy interior.
10. Frequently Asked Questions (FAQ)
Q: Why is my omelet brown?
A: Browning (the Maillard reaction) happens when the heat is too high or the eggs stay in contact with the pan too long. For a classic French omelet, keep the heat at medium and keep the eggs moving.
Q: Can I use milk or cream in my eggs?
A: While common in “diner-style” omelets, traditionalists avoid it. Milk can dilute the egg flavor and cause the omelet to become watery. High-quality eggs and butter provide all the richness you need.
Q: My omelet always breaks when I fold it. What am I doing wrong?
A: Usually, this means the eggs are too dry. Fold the omelet while the top still looks slightly “wet.” The residual heat will finish the cooking on the plate.
Q: Is a cast-iron pan okay for omelets?
A: Only if it is exceptionally well-seasoned. For beginners, a modern non-stick pan is much more forgiving.