1. Introduction
There is an undeniable magic in the architecture of a trifle. It is a dessert that demands attention before the first spoonful is even taken. When we talk about the Red, White, and Blue Berry Trifle, we aren’t just discussing a sweet treat; we are celebrating the quintessential spirit of summer gatherings, Independence Day celebrations, and the peak of berry season.
The trifle finds its roots in 16th-century England, originally starting as a simple flavored cream. Evolution brought us the “proper” British trifle—layers of sponge cake soaked in sherry, custard, and fruit. However, the American adaptation has taken a lighter, more refreshing turn. By swapping heavy custard for airy whipped cream or sweetened cream cheese, and focusing on the vibrant hues of strawberries and blueberries, we’ve created a masterpiece of “Americana” on a spoon.
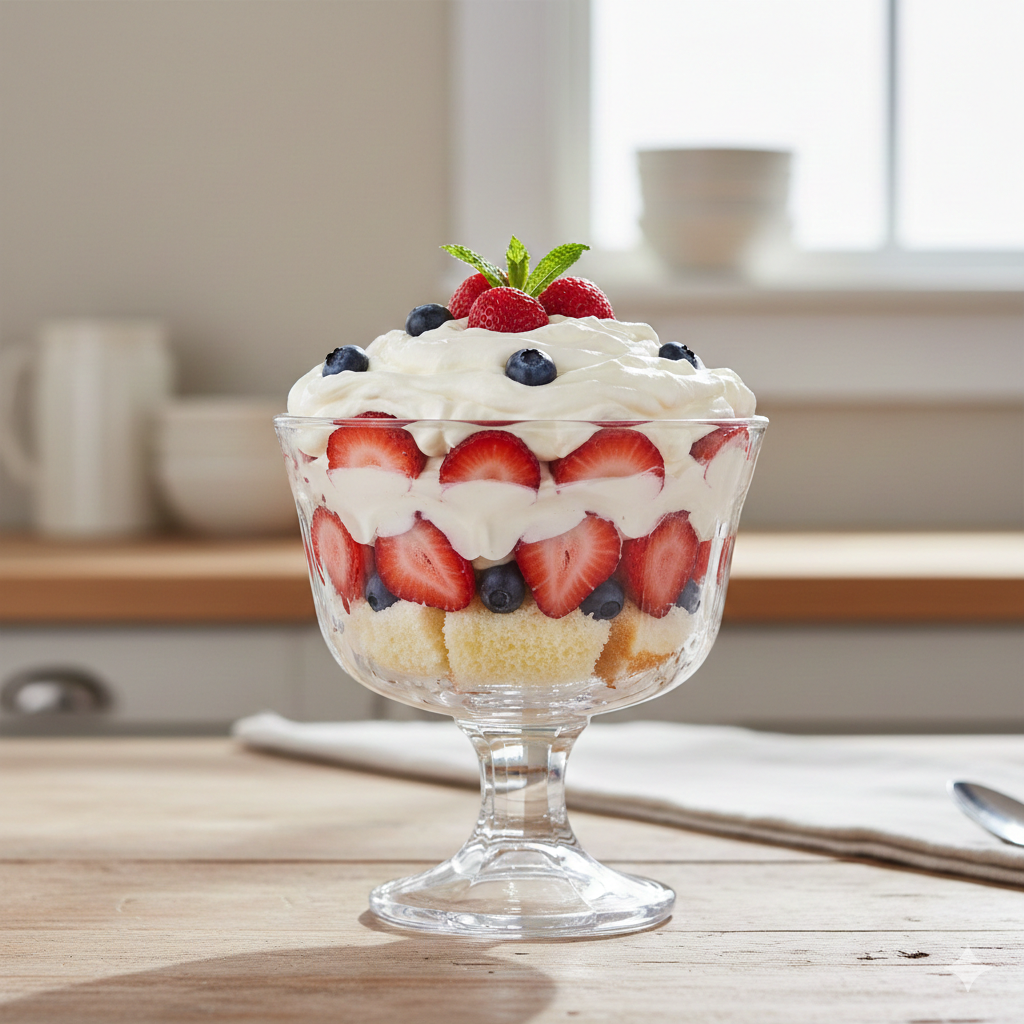
What makes this specific dish a staple for the Fourth of July or Memorial Day is the visual representation of the flag. The stark white of the cream, the deep crimson of macerated strawberries, and the royal blue of fresh blueberries create a high-contrast aesthetic that requires no artificial food coloring. It is nature’s own palette at work.
2. Recipe Overview
- Cuisine Type: American / Dessert
- Difficulty Level: Easy (No-bake)
- Total Time: 45 minutes (plus 4 hours chilling time)
- Dietary Classifications: Vegetarian. Can be adapted for Gluten-Free or Low-Sugar diets.
3. Equipment and Tools
To achieve the iconic “layered” look, the container is just as important as the ingredients.
- Trifle Bowl: A clear glass pedestal bowl is traditional.
- Volume: 3 to 4 quarts (approx. 2.8 to 3.8 liters).
- Dimensions: 8 inches in diameter, 5 to 7 inches deep.
- Stand Mixer or Handheld Electric Mixer: Essential for achieving stiff peaks in the heavy cream.
- Large Mixing Bowls: Two needed (one for the cream mixture, one for tossing berries).
- Serrated Bread Knife: For clean, square cuts of the sponge cake.
- Offset Spatula: For smoothing the cream layers to the edges of the glass.
- Rubber Spatula: For folding ingredients gently to maintain aeration.
4. Serving Suggestions
Plating Recommendations
While the trifle is usually scooped directly from the bowl into individual glass ramekins, you can elevate the presentation by using a long-handled silver spoon to ensure every guest gets a “vertical slice” of all layers.
Garnish Ideas
- Mint Leaves: A pop of green provides a beautiful contrast to the red and blue.
- White Chocolate Shavings: Adds a touch of elegance and extra “white” to the top.
- Star-Shaped Fruit: Use a small cookie cutter to cut star shapes out of apple slices or jicama to place on top.
Beverage Pairings
- Prosecco or Moscato d’Asti: The bubbles and slight sweetness complement the berries perfectly.
- Iced Hibiscus Tea: A non-alcoholic option that echoes the red fruit notes.

5. Nutritional Information
Per Serving (approx. 1 cup)
| Nutrient | Amount |
| Calories | 320 kcal |
| Total Fat | 18g |
| Saturated Fat | 11g |
| Carbohydrates | 38g |
| Fiber | 3g |
| Protein | 4g |
Potential Health Benefits: Berries are powerhouses of antioxidants and Vitamin C. By using a Greek yogurt-based cream or reducing added sugars, this dessert can be a lighter alternative to traditional cakes.
6. Storage and Reheating
- Refrigeration: This dessert must be kept refrigerated. It is actually better after 4 hours of chilling, as the cake absorbs the juices. It stays fresh for up to 48 hours.
- Freezing: Not recommended. The cream will separate, and the berries will become mushy upon thawing.
- Note on Softening: If using a pound cake, the texture holds up well. If using angel food cake, eat within 24 hours to avoid it becoming overly soggy.
7. Expert Tips and Variations
Professional Tips
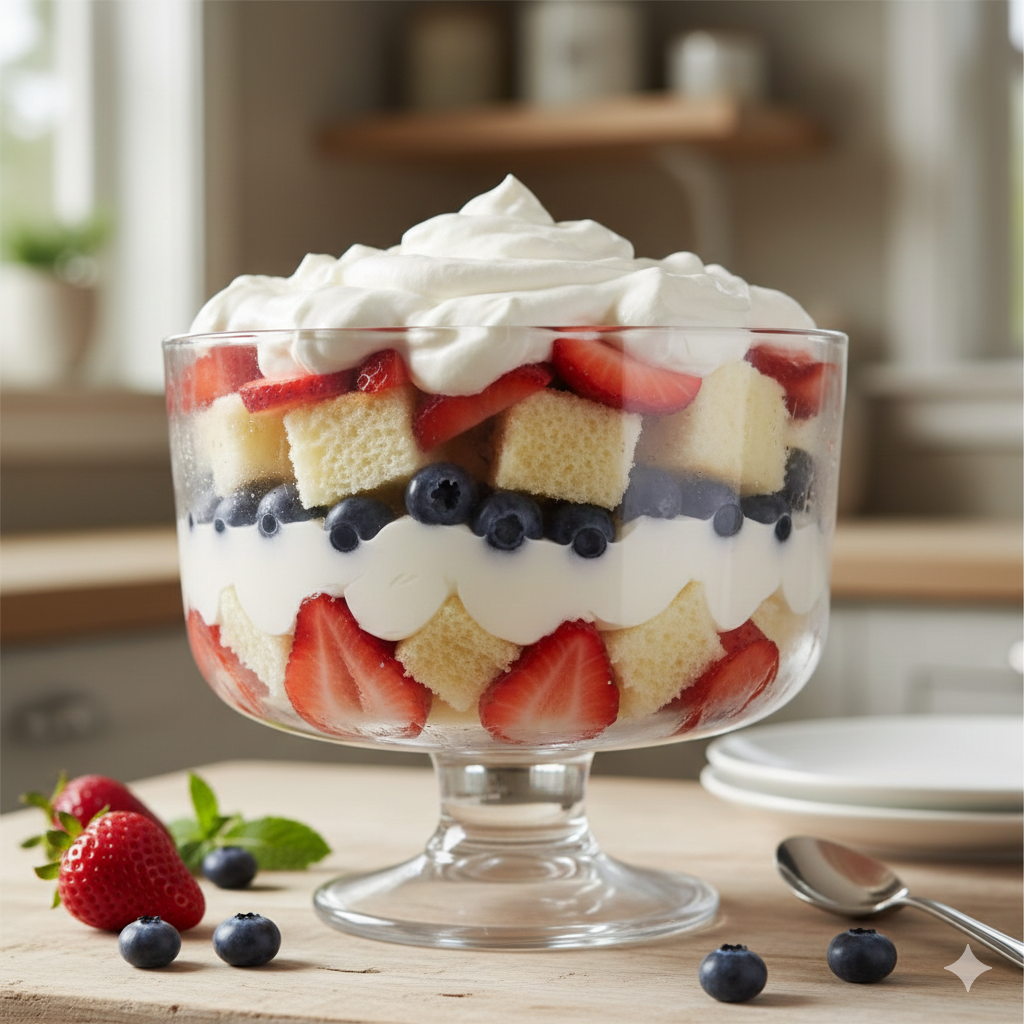
- The “Edge” Technique: When layering, always place fruit and cream against the glass first, then fill the center. This ensures the distinct lines of the “Red, White, and Blue” are visible from the outside.
- Stabilize Your Cream: If the party is outdoors, fold in a bit of softened cream cheese or mascarpone to the whipped cream. This prevents it from “weeping” or melting in the heat.
Variations
- The Boozy Trifle: Brush the cake layers with a Limoncello or Grand Marnier syrup for an adult-only version.
- Lemon-Berry Twist: Fold lemon curd into the cream layer for a bright, citrusy punch.
- Chocolate Lovers: Swap the vanilla sponge for chocolate cake and use raspberries instead of strawberries.
8. Ingredients Section
The “Red” (Berry Mixture)
- Strawberries: 2 lbs (900g), hulled and sliced.
- Raspberries: 1 cup (125g), fresh.
- Granulated Sugar: 2 tbsp (for macerating).
The “White” (Cream Layer)
- Heavy Whipping Cream: 2 cups (480ml), chilled.
- Powdered Sugar: 1/2 cup (60g).
- Vanilla Bean Paste: 1 tsp (or vanilla extract).
- Cream Cheese: 8 oz (225g), softened to room temperature.
The “Blue”
- Blueberries: 2 cups (300g), fresh and rinsed.
The Foundation
- Angel Food Cake or Pound Cake: 1 large loaf (approx. 12-16 oz), cut into 1-inch cubes.
9. Step-by-Step Instructions
Step 1: Prepare the Berries
In a medium bowl, toss the sliced strawberries with 2 tablespoons of granulated sugar. Let them sit for 15 minutes. This process, called maceration, draws out the natural juices which will eventually soak into the cake.
Step 2: Whip the “White” Layer
In your stand mixer, beat the softened cream cheese and powdered sugar until smooth. In a separate bowl, whip the heavy cream and vanilla until stiff peaks form. Gently fold the whipped cream into the cream cheese mixture using a rubber spatula.
Step 3: The First Layer (Cake)
Place 1/3 of the cake cubes at the bottom of the trifle bowl. Press down slightly to create a solid base.
Step 4: The Second Layer (Red)
Add half of the strawberry mixture (including the juice) over the cake. Ensure some slices are pressed flat against the glass.
Step 5: The Third Layer (Cream)
Spread 1/3 of the cream mixture over the strawberries. Use an offset spatula to push the cream all the way to the edges.
Step 6: The Fourth Layer (Blue)
Scatter half of the blueberries over the cream.
Step 7: Repeat
Repeat the layers (Cake, Strawberries, Cream, Blueberries) until you reach the top. End with a thick layer of the cream.
Step 8: The Grand Finale
Decorate the top with the remaining berries in a pattern—perhaps a star or concentric circles. Cover with plastic wrap and chill for at least 4 hours.
10. Frequently Asked Questions (FAQ)
Q: Can I make this a day in advance?
A: Yes! In fact, the flavors meld better overnight. Just wait to add the final decorative berry layer until shortly before serving to keep the top looking crisp.
Q: Can I use frozen berries?
A: It is not recommended. Frozen berries release too much liquid and may dye the white cream purple or pink, ruining the “Red, White, and Blue” aesthetic.
Q: What if I don’t have a trifle bowl?
A: Any large glass punch bowl or even individual mason jars work perfectly. The goal is transparency!
Q: How do I make this gluten-free?
A: Simply swap the traditional cake for a gluten-free sponge or pound cake. Most grocery stores now carry these in the freezer or bakery section.
Q: My whipped cream is runny. How do I fix it?
A: Ensure your cream is ice-cold before whipping. If it’s still soft, you can add a tablespoon of instant vanilla pudding mix to help stabilize it instantly.
